
Artwork Files for DTF Printing: A Guide for Non-Designers
Most print jobs fail before they reach the heat press. The artwork file is the single biggest reason orders get delayed, colours look wrong, or prints come out soft and pixelated. If you have never prepared artwork files for DTF printing before, this guide gives you everything you need to get it right the first time, without needing design software experience or a degree in graphic arts. Everything here is based on what actually causes problems at the print stage, not theoretical advice.
Table of Contents
- Why File Quality Matters More Than the Design Itself
- Quick Takeaways
- File Formats Explained: What Works and What Wastes Your Time
- Resolution and Size: The Numbers You Cannot Ignore
- Colour Mode and Background: Two Settings That Ruin Prints
- Preparing Files Without Professional Design Software
- Comparison of File Types for DTF Printing
- Common Mistakes That Delay Orders and How to Avoid Them
- How Psyque Handles Your Artwork Before Printing
- Frequently Asked Questions
- References
Why File Quality Matters More Than the Design Itself
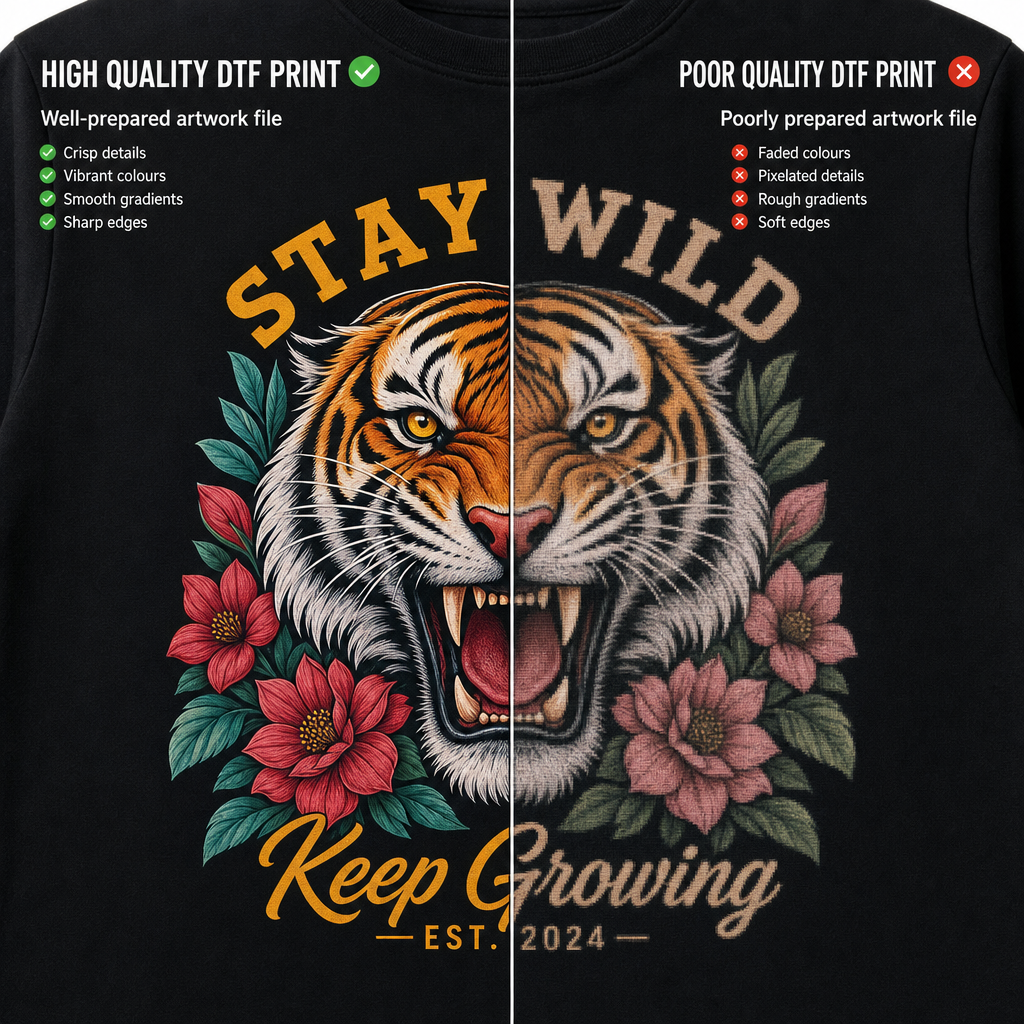
A brilliant design in the wrong file format will produce a mediocre print. This is not an opinion. DTF printing works by transferring ink from a film sheet onto fabric using a heat press, and the quality of that transfer depends entirely on the data in the file you supply. Low-resolution images stretch at the print stage, thin fonts break apart, and transparent backgrounds become white boxes if the file is not set up correctly.
The good news is that getting your file right is not complicated once you understand the specific requirements. Most of the mistakes non-designers make come down to three things: wrong file format, wrong resolution, and wrong colour mode. Fix those three things and you will eliminate around 90% of the artwork issues that cause delays.
Quick Takeaways
| Key Insight | Explanation |
|---|---|
| Use PNG for most files | PNG supports transparent backgrounds, which is essential for DTF transfers that sit directly on fabric without a white rectangle border. |
| 300 DPI is the minimum resolution | Anything below 300 DPI at the intended print size will produce visible pixelation, especially on detailed logos or small text. |
| Set colour mode to RGB, not CMYK | DTF RIP software processes RGB files more accurately. Supplying CMYK can cause unexpected colour shifts during the conversion process. |
| Send files at actual print size | A file designed at 5cm that needs to print at 30cm cannot be scaled up without quality loss. Build the file at the final intended size. |
| Transparent backgrounds prevent white halos | If your PNG has a white background, that white will transfer onto the garment as a visible block around your design. |
| Vector files are the safest option for logos | AI or EPS vector files scale to any size without losing sharpness, making them ideal for brand logos used across multiple garment sizes. |
| Flatten text before sending | Live text in design files can reflow or disappear if the printer does not have your font installed. Convert all text to outlines or rasterise it before submitting. |
Getting these fundamentals right before you place your order saves you from back-and-forth emails, proof rejections, and delays on your dispatch date. For businesses ordering branded workwear in bulk, one failed artwork file can push a delivery back by days.
File Formats Explained: What Works and What Wastes Your Time
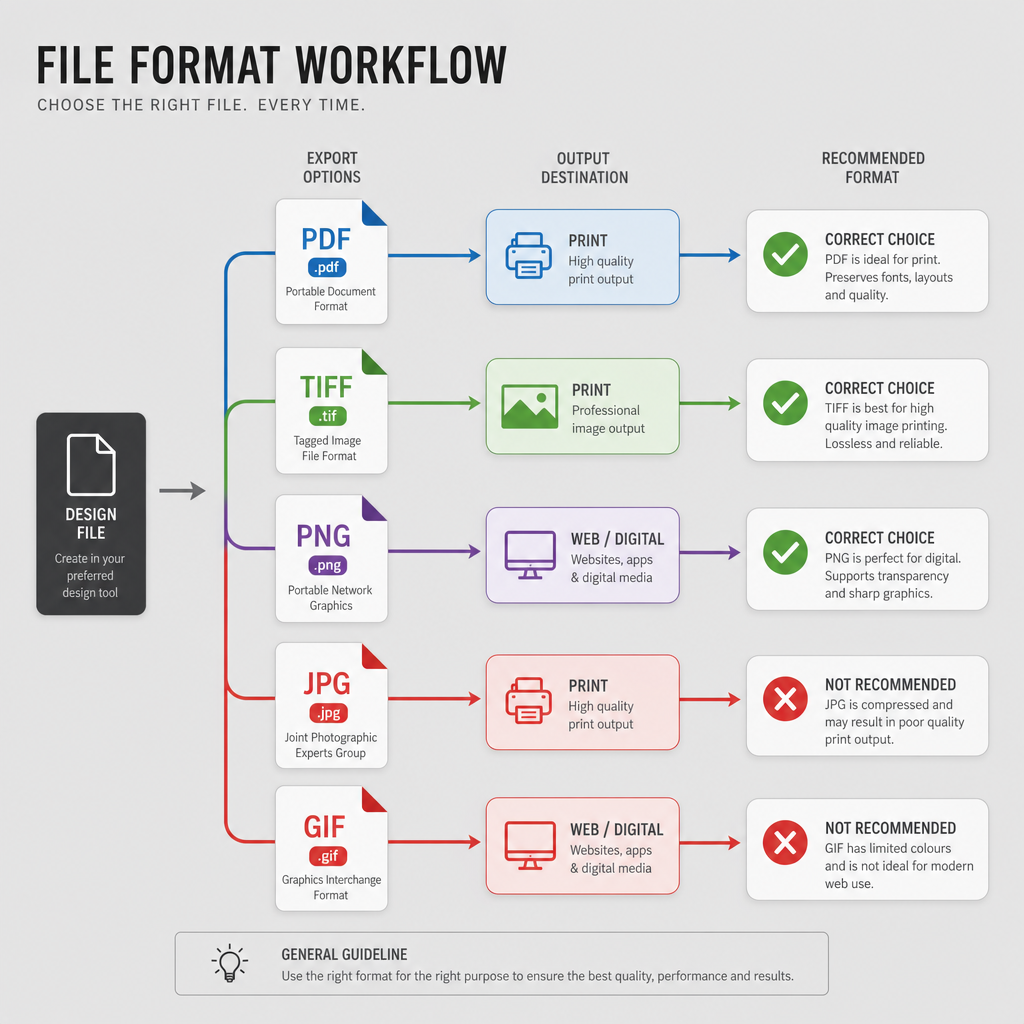
Not all image files are equal when it comes to DTF printing. The format you choose determines how much control the printer has over quality, transparency, and colour accuracy. Here is a direct breakdown of what works and what causes problems.
PNG Files: The Standard for Most Orders
PNG is the most common format for DTF artwork and the one most printers, including the team at Psyque, prefer to receive. PNG supports 24-bit colour and, critically, alpha channel transparency. That transparency layer tells the RIP software exactly where your design ends and the garment begins, eliminating white halos or box outlines around your print.
PNG files should be exported at 300 DPI minimum at the actual intended print size. A PNG that looks sharp on screen at 96 DPI will print at roughly one-third the physical size when printed at the correct 300 DPI resolution. This catches out non-designers constantly.
Vector Files: Best for Logos and Simple Graphics
Vector files, typically AI, EPS, or SVG formats, use mathematical paths rather than pixels. This means they can scale from a 3cm chest logo to a full-back print without any loss of sharpness. If you have a brand logo, always request the original vector file from whoever created it.
If you only have a JPEG of your logo, do not attempt to trace it yourself in a free tool unless you know what you are doing. A poorly auto-traced vector can actually produce worse results than a clean high-resolution PNG.
What to Avoid
JPEG files compress image data and do not support transparency. They are acceptable only if the design has no transparent areas and the file was saved at maximum quality. Avoid using screenshots, images exported from Word documents, or anything below 150 DPI. These formats produce blurred prints with visible compression artefacts around edges and fine details.
Pro tip: If you are downloading a logo from your own website to send to a printer, check the file size. A logo image below 50KB is almost certainly too low-resolution for print use. Ask your web designer or brand agency for the original print-quality file.
Resolution and Size: The Numbers You Cannot Ignore
Resolution and physical dimensions are two separate things, but they are directly connected in print. A file that is 1000 pixels wide sounds large, but at 300 DPI it prints at just 8.5cm wide. If you need a 30cm print width, you need a file that is at least 3543 pixels wide at 300 DPI. This is the single most common reason artwork gets rejected or prints poorly.
Calculating the Right File Size
The formula is straightforward: multiply the print size in inches by 300 to get the required pixel dimension. A standard A4-sized back print at 21cm x 29.7cm (approximately 8.3 x 11.7 inches) requires a file that is at least 2490 x 3510 pixels at 300 DPI.
Most non-designers build files to look good on screen rather than to print specifications. Screens display at 72 to 96 DPI, so an image that fills your monitor might only produce a 6cm print. Always work backwards from the final print size, not from screen appearance.
Where to Set the Size in Common Tools
In Canva, you can set a custom document size using centimetres. Set your canvas to the exact print dimensions and export at the highest quality available, selecting PNG as the format. In Adobe Illustrator or Photoshop, set the artboard or canvas at the correct physical size and 300 DPI from the start. Changing resolution after the fact in Photoshop, known as upscaling, adds pixels artificially and does not improve print quality.
"Resolution is not just a technical setting. It is a direct measure of how much information is available to reproduce your design accurately on a physical surface." - Adobe Print Production Guides
Pro tip: When ordering from Psyque, state your intended print dimensions in the order notes. If your file dimensions do not match the size you want, the team can flag this before printing rather than discovering the mismatch after the transfer is made.
Colour Mode and Background: Two Settings That Ruin Prints
Colour mode is a setting most non-designers never touch, and that is a problem. DTF printers use RGB-based RIP software to drive their print heads. When you supply a CMYK file, the software converts it back to RGB during processing. That conversion is not always clean, and it can cause colours to look duller, shift towards slightly different hues, or lose vibrancy compared to what you see on screen.
RGB vs CMYK for DTF
RGB (Red, Green, Blue) is the native colour space for screens and for DTF printing. It has a wider colour gamut than CMYK, meaning brighter and more saturated colours are achievable with DTF than with traditional screen printing or offset methods. This is one of the genuine technical advantages of DTF, and it only works in your favour if you supply RGB files.
CMYK (Cyan, Magenta, Yellow, Key/Black) is designed for traditional offset and commercial printing where four ink plates are used. If your designer has provided a CMYK file because they also supply print-ready PDFs for brochures or business cards, ask them to export a separate RGB version at 300 DPI for your garment order.
Transparent vs White Backgrounds
A transparent background in a PNG file appears as a grey checkerboard pattern in design software. This is correct. It means no background colour will transfer with your design. If you save a PNG from a white canvas, that white is embedded in the file and will print as a solid white rectangle around your design on the garment.
For dark garments, DTF printing applies a white underbase layer automatically to make colours pop. This underbase is applied only under your actual design elements. If your file has an incorrect white background, the underbase will extend across the entire white area, creating a large visible block on the fabric. Always check your file against a mid-grey or dark background in your design software before exporting.
Preparing Files Without Professional Design Software
You do not need Photoshop or Illustrator to prepare a usable artwork file. Several accessible tools allow non-designers to create and export print-ready files, as long as you know the specific settings to use.
Using Canva for Print Artwork
Canva is widely used by small business owners creating branded workwear designs. Set up a custom canvas at your exact print dimensions in centimetres before you start designing. Use Canva's transparent background option, available on the paid plan, and export as PNG at the highest quality setting.
One limitation of Canva is that its export resolution is capped at approximately 300 DPI for print-quality exports. This is adequate for most garment prints, but for very detailed small text or intricate patterns you may find edges are slightly soft compared to a native vector file. For straightforward logo and text designs on workwear, Canva is a perfectly viable tool.
Using Google Slides or PowerPoint
Do not use these. Both tools export at screen resolution (typically 96 to 150 DPI depending on export settings) and do not support true transparent backgrounds in the way DTF printing requires. Designs created in these tools consistently produce poor print results regardless of how they look on screen.
Getting a File from Your Brand Designer
If your logo or brand assets were created by a designer, request the following: a PNG file at 300 DPI at your largest intended print size, with a transparent background and in RGB colour mode. A good designer will have these ready or can export them in minutes. Most brand packs include print-ready files as standard.
Comparison of File Types for DTF Printing
| File Format | Best For | Key Limitation |
|---|---|---|
| PNG (300 DPI, RGB, transparent) | Most garment designs including photographic prints, gradients, and multi-colour logos | File must be built at correct physical size. Cannot be upscaled without quality loss. |
| AI or EPS (Vector) | Simple logos, icons, and text-based designs that need to scale across multiple garment sizes | Requires a vector-capable design tool to create. Raster effects embedded in vectors still need to be at 300 DPI. |
| JPEG (maximum quality) | Photographic designs with no transparent areas where a PNG is unavailable | No transparency support. Compression artefacts reduce edge quality. Not recommended as a first choice for DTF. |
In practice, PNG at 300 DPI covers the vast majority of orders placed with Psyque. Vector files are the better option for logo-only workwear designs, particularly when the same logo will appear at different sizes across t-shirts, polos, and hoodies in a single order.
Common Mistakes That Delay Orders and How to Avoid Them
After preparing files for DTF print orders, the same errors appear repeatedly. These are the mistakes that cost time and money, and every one of them is preventable.
Sending a File That Is Too Small
Uploading a 400 x 400 pixel logo and expecting a 25cm chest print is the most common source of delayed orders. At 300 DPI, a 400 x 400 pixel file prints at just 3.4cm. Always check your pixel dimensions against the intended print size before submitting.
Including a White or Coloured Background in the File
As covered above, any background colour embedded in your PNG will transfer to the garment. The fix is simple: export with a transparent background. If you cannot remove the background in your current tool, contact Psyque at the order stage and explain the situation. File preparation assistance is available, but flagging it early avoids delays.
Using CMYK Colour Mode
Designers working across both print and digital formats sometimes default to CMYK. For DTF orders, always request or export in RGB. If you are not sure which colour mode your file is in, open it in any image editor. Most will display the colour profile in the document settings or file information panel.
Live, Unflattened Text
If your design includes text created in a design tool and you export as a layered file format, that text may reflow or disappear at the print stage if the font is not available on the printer's system. Convert all text to outlines or curves before exporting, or rasterise the entire design at 300 DPI into a flat PNG.
Forgetting to Check the File at Actual Print Size
Zoom your file to 100% in your design software and hold a ruler against the screen. This gives you a rough physical indication of how large the print will be. It is not perfectly accurate but it quickly reveals when a design is dramatically undersized for the garment it is intended for.
How Psyque Handles Your Artwork Before Printing
When you place a custom clothing order with Psyque, the team reviews your artwork before it goes to the DTF printer. This step exists because most customers are not professional designers, and catching a file issue at the review stage is far less disruptive than discovering it mid-production.
Psyque's in-house team checks resolution, colour mode, background transparency, and print sizing as part of the standard order process. If your file has a recoverable issue, you will be contacted with a clear explanation of what needs to change. This is one meaningful difference from fully automated online print platforms where your file goes straight to print regardless of quality.
For businesses ordering branded workwear bundles, this review process is especially important when the same design needs to print consistently across multiple garment types. A chest logo on a polo sits differently than the same logo on a hoodie, and sizing adjustments are sometimes needed even when the original file is technically correct.
If you are unsure about your artwork before ordering, Psyque can advise on file requirements. Checking the Psyque homepage for current contact options is the fastest route to a direct answer on your specific file situation rather than guessing.
Frequently Asked Questions
What is the best file format to send for DTF printing?
PNG with a transparent background, RGB colour mode, and 300 DPI at the actual intended print size is the best format for the majority of DTF orders. Vector files in AI or EPS format are preferable for simple logos that need to scale across different garment sizes.
Can I use a design from Canva for my DTF print order?
Yes, provided you set the canvas size to your exact print dimensions in centimetres before designing, use a transparent background, and export as a high-quality PNG. Canva's free plan does not support transparent backgrounds, so you will need the paid plan for DTF-ready exports.
How do I know if my file is high enough resolution for print?
Divide your file's pixel width by 300 to get the maximum printable width in inches. For example, a 2400 pixel wide file can print at a maximum of 8 inches (approximately 20cm) at 300 DPI. If your intended print size is larger than this, your file needs to be rebuilt at a higher resolution before it will print clearly.
Why does my design look different on the garment compared to my screen?
Screen colours are displayed in RGB using backlit pixels, which makes colours appear more vivid and luminous than any physical print. DTF printing achieves strong colour reproduction but cannot replicate the brightness of an illuminated screen. The most significant differences occur with neon colours and very bright blues or greens. Supplying your file in RGB rather than CMYK reduces unexpected colour shifts during processing.
Do I need to remove the background from my logo before sending it?
Yes, if your logo has a white or coloured background. The background will transfer to the garment and appear as a visible block around your design. Export your logo as a PNG with a transparent background. If you only have a JPEG version of your logo, contact Psyque before ordering and explain the situation so the team can advise on the best approach.
What size should I make my artwork file for a t-shirt print?
For a standard front chest print, a common size is around 10cm x 10cm, which requires a file of at least 1181 x 1181 pixels at 300 DPI. For a full front or full back print, work to approximately 30cm x 40cm, which requires a file of at least 3543 x 4724 pixels. Always confirm the exact dimensions with Psyque before building your file if you are unsure.
If you have recently prepared artwork files for a DTF print order, share what worked or what caught you out. Your experience could save another small business owner significant time and frustration.
We would love your feedback and any insights you would share with others. What perspective would you add?
References
- Adobe resources on colour modes, resolution, and print-ready file preparation
- Forbes coverage of small business branding and custom merchandise trends
- Statista data on the custom apparel and branded merchandise market
- Canva guidance on designing and exporting print-quality files for garment printing
- Industry guidance on digital file standards for garment and textile printing