A Guide to Custom T-Shirt Printing
So, you have an idea for a t-shirt. Maybe it's a killer logo for your startup, a piece of art you've poured your soul into, or a unifying design for your whole crew. How do you get that idea off the screen and onto a piece of wearable fabric?
That's where custom t-shirt printing comes in. It’s the art of turning a blank tee into a statement, a walking billboard, or a piece of personal memorabilia. This isn't just about sticking a picture on some cotton; it's about creating something that people actually want to wear.
This guide is your blueprint. We'll walk you through the entire process, from that first spark of an idea to holding the finished product in your hands.
Your Starting Point for Turning Ideas into Reality
Welcome to the world of custom tees. Think of this as the ground floor for turning your creative vision into something real and tangible. Whether you’re building a brand from scratch, showing off your artistic skills, or just want to make something cool for your mates, custom t-shirts are a powerful medium.
They're more than just clothes; they're a canvas. They can be a promotional tool that gets your name out there or a personal gift that means the world to someone.
Why Custom T-Shirts Matter
In a world flooded with mass-produced fashion, the hunger for something unique is bigger than ever. Personalised apparel lets people and brands cut through the noise. It’s the perfect mash-up of self-expression and smart marketing.
The numbers back it up. The UK's custom t-shirt printing market was valued at around USD 310.48 million in 2023 and is on track to hit USD 526.78 million by 2032. This explosion is fuelled by better digital printing tech and a growing demand for one-of-a-kind gear. If you're into the market stats, you can dig deeper with this detailed report on Credence Research.
We'll break down the entire journey, covering all the crucial bits that guarantee your final product looks awesome.
Here’s what we’ll get into:
- Printing Methods: We'll look at the tech behind the ink, from modern DTF to old-school screen printing.
- Fabric Choices: Getting the right material is key to making a shirt that feels as good as it looks.
- Design Prep: We’ll show you how to get your files ready for printing to ensure the results are sharp and vibrant.
A killer custom t-shirt is a mix of three things: a solid design, the right print technique, and a quality garment. Get all three right, and you've created a tee that people will fight over.
Preparing for Your Project
Before we dive deep, let's talk planning. Getting a great result often comes down to the decisions you make before you even start. Think of the table below as your pre-flight checklist. Each choice you make—from the fabric to the print method—will shape the look, feel, and cost of your final t-shirts.
Key Considerations for Your Printing Project
Getting these basics sorted first will save you a ton of headaches down the line and help you make smarter decisions as we go through each step.
| Consideration | Why It Matters | Best For |
|---|---|---|
| Quantity | Affects the cost per item and which printing method is most economical. |
Small Batches: DTF, DTG Large Batches: Screen Printing |
| Design Complexity | Intricate details, gradients, and multiple colours can rule out certain methods. |
Complex/Photographic: DTF, DTG Simple/Bold: Screen Printing |
| Fabric Type | Not all print methods work well on all materials (e.g., cotton vs. polyester). |
Cotton/Blends: Most methods Synthetics: DTF, Sublimation |
| Budget | Your total budget will guide your choices on garment quality and print method. |
Low Budget: Simple designs, large runs High Budget: Premium fabrics, complex prints |
| Turnaround Time | Some methods are faster for small, urgent orders. |
Fast: DTF, DTG Slower (due to setup): Screen Printing |
With this foundation, you’re ready to get into the nuts and bolts of the process with confidence. Let's make sure the vision in your head is exactly what you get on the shirt.
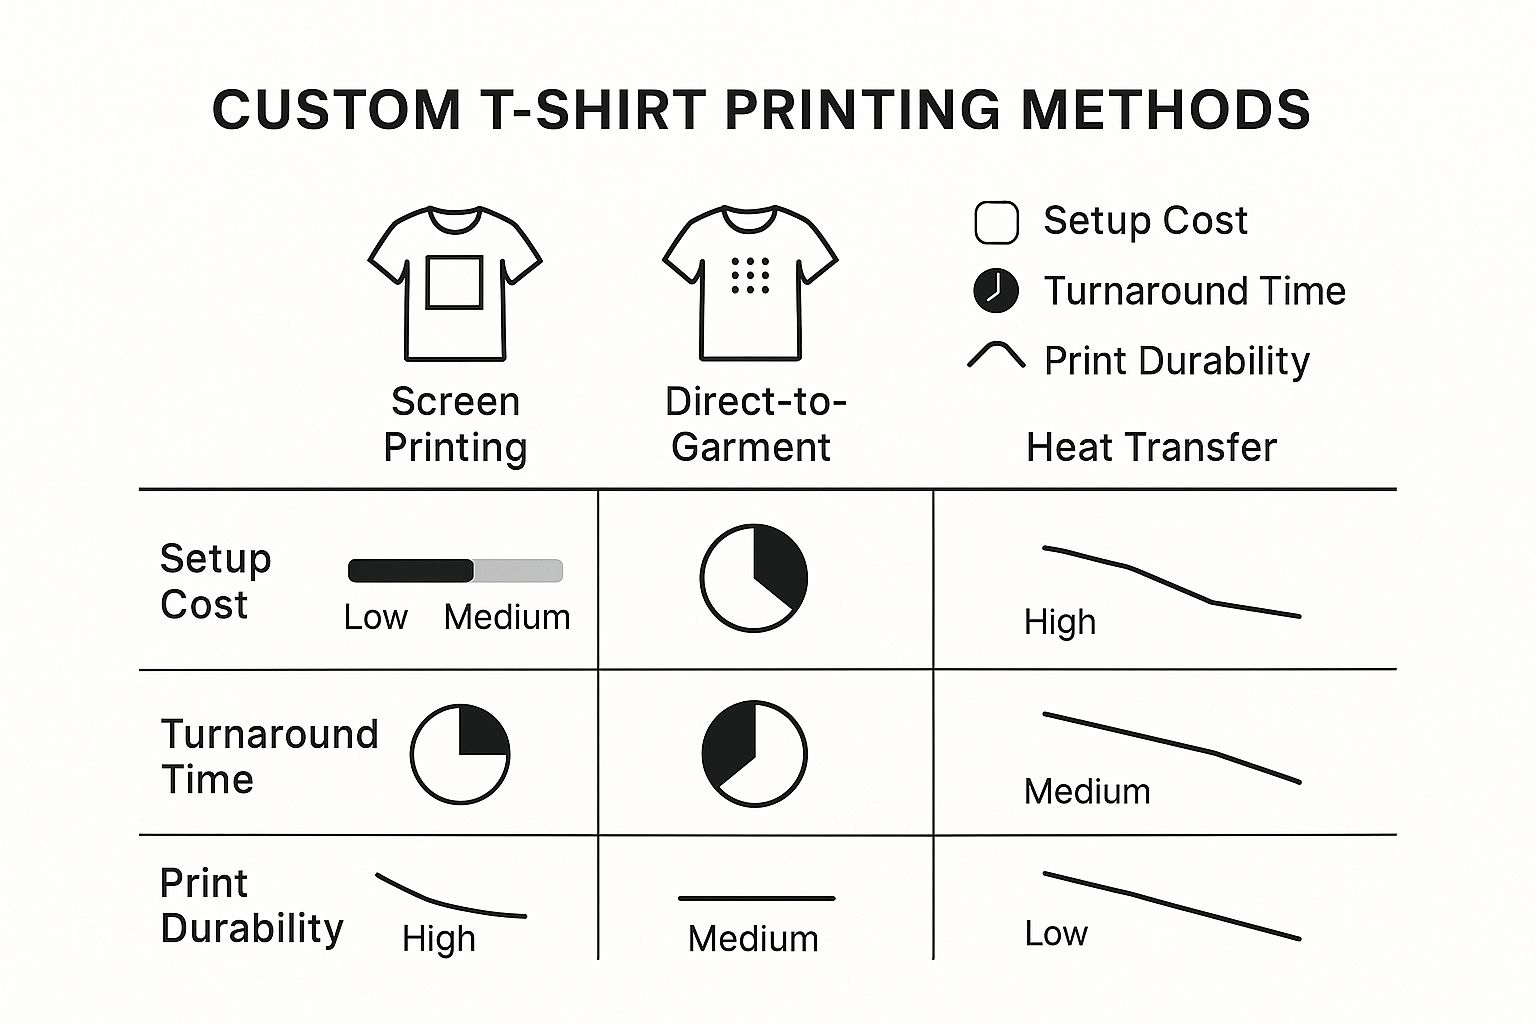
Choosing the Best T-Shirt Printing Method
Picking the right printing method for your custom tee is like choosing a weapon for battle. You wouldn't bring a butter knife to a sword fight, right? The best technique all comes down to what you need: your order size, how ridiculously detailed your design is, and the fabric you're printing on. Getting your head around the main players ensures your final shirt looks killer, not killed.
The big three you'll hear about are Direct-to-Film (DTF), screen printing, and Direct-to-Garment (DTG). Each one has its own turf and its own strengths. Let's break them down so you can pick the right tool for your creative war.
Direct to Film (DTF): The Versatile Powerhouse
Think of DTF printing like a high-tech, permanent sticker made for fabric. We print your design onto a special film, dust it with an adhesive powder, and then heat-press it straight onto the t-shirt. The result is a crazy vibrant, super-detailed print that sits on top of the fabric, feeling solid and built to last.
The biggest win for DTF is its sheer versatility. It sticks to pretty much anything—cotton, polyester, blends, even the weird fabrics other methods can't touch. This makes it a beast for everything from custom sports jerseys to one-of-a-kind tote bags.
DTF printing shines where other methods stumble. It can smash out full-colour, complex designs on almost any material with no minimum order. It's the go-to for modern, on-demand custom apparel.
This method is perfect for small runs or even single, one-off prints because there's almost no setup. Need one hyper-detailed tee for a mate's birthday or a batch of ten for your startup? DTF gets it done without breaking the bank.
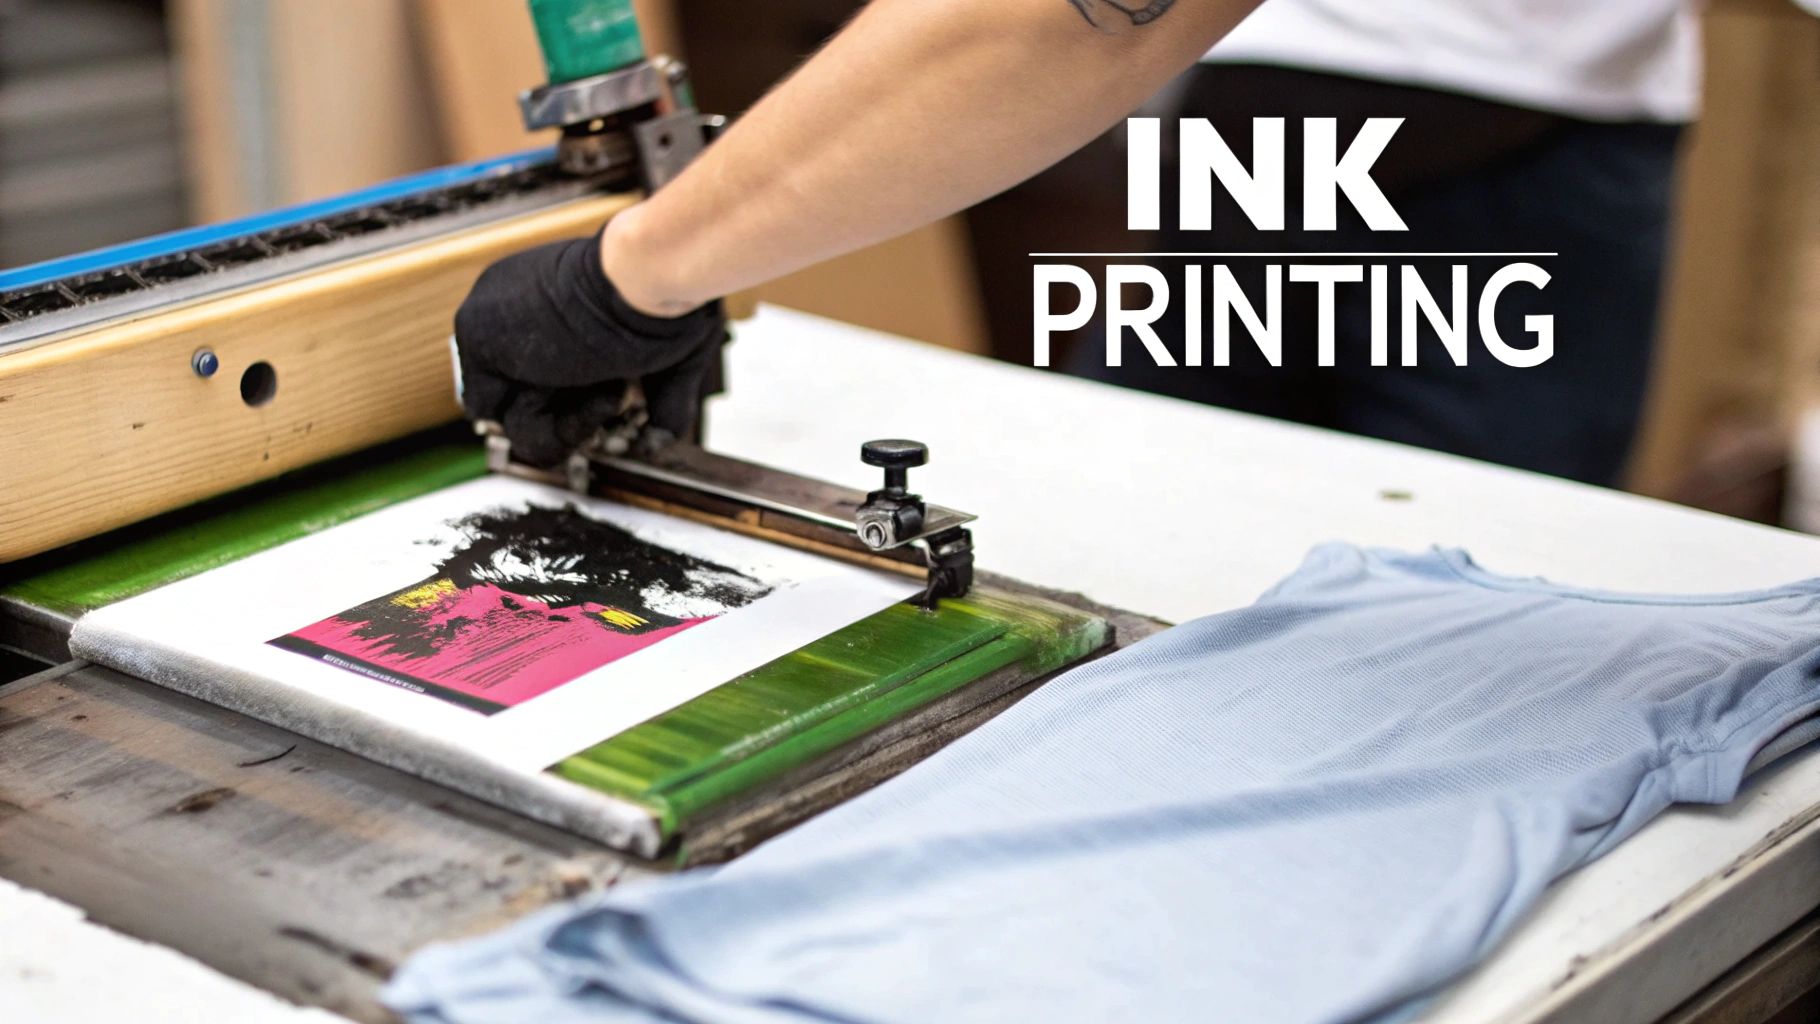
Screen Printing: The Bulk Order Champion
Screen printing is the OG of the t-shirt world, the battle-tested workhorse. It works by creating a stencil (a "screen") for every single colour in your design. Ink is then pushed through these screens one by one, right onto the shirt. It’s a classic for a reason—it produces incredibly bold, vibrant prints that feel like they'll outlive you.
Because you have to make a new screen for every colour, the setup is where the work is. This makes it way more cost-effective for big jobs, usually 25 shirts or more. The more you print, the cheaper each shirt gets. It's the undisputed king for big events, company merch, or a band tour where you're slinging hundreds of identical tees.
But screen printing isn’t great for complex, multi-coloured stuff like photos. Every new colour means another screen and more cost, so it’s best for designs with just a few solid colours. For a deeper dive, check out our smackdown of DTF vs. screen printing.
Direct to Garment (DTG): The Digital Artist
Direct-to-Garment (DTG) is basically an inkjet printer, but for clothes. The t-shirt gets loaded in, and the printer sprays ink directly into the fabric's fibres. This is the one you want for printing photos or super-detailed art with millions of colours and smooth gradients.
The ink soaks right in, so the print feels incredibly soft—you can barely feel it's there. The catch? DTG works best on 100% cotton and can look a bit washed out on dark shirts unless a white base layer is printed first.
Just like DTF, DTG is brilliant for small orders and one-offs with no setup fees. It's the hero for that single, photo-realistic t-shirt, but it might not hold up to as many brutal wash cycles as DTF or a screen print.
To make things even clearer, we've put together a simple comparison table to help you decide which method is right for your project.
Comparison of T-Shirt Printing Techniques
| Printing Method | Best For | Feel & Durability | Cost-Effectiveness |
|---|---|---|---|
| DTF | Small to large runs, complex full-colour designs, and printing on any fabric (cotton, poly, blends). | Sits on top of the fabric with a slight texture. Very durable and crack-resistant. | Excellent for small orders and one-offs. Becomes competitive with screen printing on medium runs. |
| Screen Printing | Large bulk orders (25+) with simple designs and few colours. | Ink soaks in slightly, creating a soft but durable finish that lasts for years. | The most cost-effective option for large quantities of the same design. |
| DTG | One-offs or small runs of photo-realistic, highly detailed designs on 100% cotton. | Ink soaks directly into the fibres, creating an ultra-soft, breathable feel with no texture. | Great for single items but can be more expensive per unit for larger orders. Durability is good but can fade faster than others. |
Each method has its place. Your choice really boils down to balancing design complexity, order size, and the final feel you're going for.
What About Other Methods?
While DTF, screen printing, and DTG run the pro game, there are other ways to get a design on a shirt, especially if you're going the DIY route. For anyone thinking of making their own custom tees at home, methods like iron transfer paper are a decent place to start.
It's cheap and easy, but let's be real—it won't give you the same professional finish or durability as the big three. At the end of the day, picking the right method means matching your ambition to the right tech.
Selecting the Right Fabric for Your Custom Tee
The material you choose for your custom t-shirt is just as important as the design itself. A killer graphic on a cheap, scratchy tee is a total waste. Fabric dictates the shirt's comfort, durability, and—most importantly—how well your printed design will look and last.
Think of the fabric as the canvas for your art. You wouldn't paint a masterpiece on a flimsy piece of cardboard, right? The same logic applies here. The right material makes sure your finished t-shirt feels as good as it looks.
Let’s break down the top choices—from classic cotton to performance polyester and versatile blends—and see how each one works with your print.
The All-Rounder: 100% Cotton
When you think of a classic t-shirt, you’re picturing 100% cotton. It’s soft, breathable, and feels natural against the skin. This makes it a solid crowd-pleaser for everything from promotional giveaways to high-end streetwear.
For printing, cotton is a dream to work with, especially for methods like Direct-to-Garment (DTG). DTG uses water-based inks that sink right into the natural fibres, resulting in a super-soft print you can barely feel.
Just a heads-up: cotton can shrink if you’re not careful, and it’s not the best for activewear since it soaks up sweat instead of wicking it away.
The Performance Choice: Polyester
Polyester is the undisputed king of athletic and performance apparel. It’s a synthetic material known for its insane durability, moisture-wicking properties, and resistance to shrinking and wrinkles. If your custom tees are for a sports team, a charity run, or gym staff, polyester is your champion.
It’s the perfect base for printing methods that need synthetic fibres. Sublimation, for example, dyes the fabric directly for a permanent, zero-feel print. And modern methods like Direct-to-Film (DTF) work exceptionally well on polyester, delivering vibrant, crisp designs that stretch with the fabric without cracking.
Your fabric choice is a technical decision, not just a stylistic one. The way the ink and fibre interact determines the print's final vibrancy, feel, and lifespan. Matching the material to the printing method is non-negotiable for a professional result.
The Best of Both Worlds: Poly-Cotton Blends
Why pick a side when you can have both? Poly-cotton blends (like a 50/50 mix or a tri-blend with rayon) offer a fantastic compromise. They bring together the softness and breathability of cotton with the toughness and moisture-wicking power of polyester.
This versatility makes them an incredibly popular choice for pretty much any custom t-shirt project. The fabric is comfortable enough for daily wear but resilient enough for more active use.
Blends also provide an excellent surface for a wide range of printing techniques, including DTF, screen printing, and heat transfers. They tend to hold their shape and colour better than pure cotton after tons of washes, making them a reliable option for custom gear that’s built to last.
Ultimately, the right fabric comes down to what the shirt is for. Think about who’s wearing it and what you want the final product to be, and you’ll make a choice that guarantees a comfortable, durable, and visually killer t-shirt.
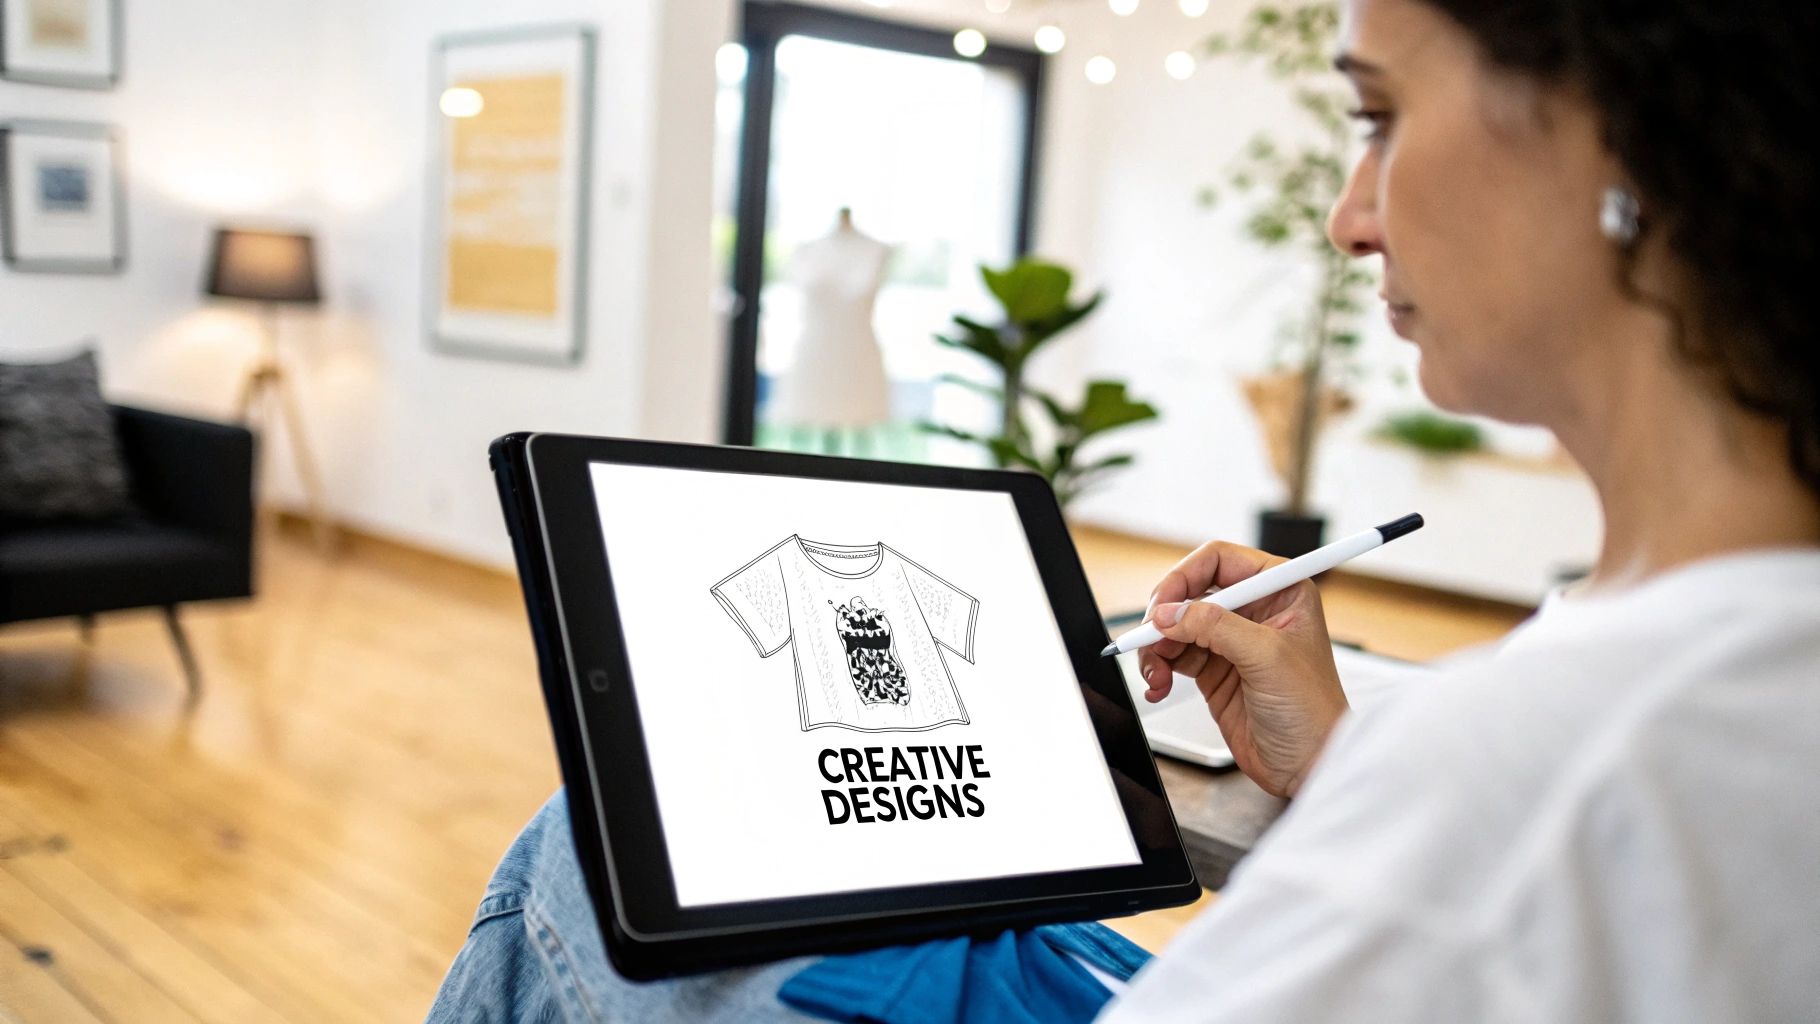
How to Prepare a Perfect Print-Ready Design
A killer design can fall flat if the digital file behind it is a mess. Getting your artwork ready for custom t-shirt printing isn't rocket science, but a few key details make the difference between a masterpiece and a muddy disaster. Think of it like this: your design is the battle plan, but the print-ready file is the perfectly sharpened axe.
Get this part wrong, and you’re looking at blurry prints, weird colours, or missing details. A little prep work now saves a ton of time, cash, and disappointment down the line. Follow this checklist, and you'll nail it every single time.
Mastering Image Resolution
The number one mistake we see? Low-resolution images. Resolution is measured in Dots Per Inch (DPI), which tells the printer how much detail to cram into every inch of ink. For clothing, the undisputed gold standard is 300 DPI.
Why does this matter so much? Picture stretching a tiny postage stamp to the size of a billboard. It would become a pixelated, ugly mess. The exact same thing happens when a low-res digital file (like a 72 DPI image you saved from a website) gets blown up to fit on a t-shirt.
A design file at 300 DPI ensures every line is crisp, every detail is sharp, and the final print looks brutally professional. Always start your design in a 300 DPI workspace or make sure your exported file hits that number at its final print size.
You can check your file's resolution using any decent photo editing software. If it’s below 300 DPI, you have to find a better quality version or, painful as it is, remake the design. Just trying to artificially increase the DPI of a low-quality file won't work—it just makes the existing pixels bigger and blurrier.
Understanding Colour Modes
Your screen and a printer see colour in two completely different languages. Screens use the RGB (Red, Green, Blue) colour mode, mixing light to create the colours you see. Printers, however, use the CMYK (Cyan, Magenta, Yellow, Black) colour mode, which mixes physical ink.
If you send an RGB file to print, expect some nasty surprises. That vibrant, electric blue on your screen might come out as a dull, sad, purplish shadow of its former self. To keep your colours true, always design and export your files in CMYK. It gives you a much more honest preview of how the colours will actually look on the shirt.
Choosing the Right File Format
The file type you save your design as is another critical piece of the puzzle. There are two main families of image files, and each has a specific job when it comes to printing on tees.
-
Vector Files (.AI, .EPS, .SVG): These are the absolute champions of clean lines and logos. Vector graphics are built from mathematical equations, not pixels. That means you can scale them up to the size of a building with zero loss of quality. Perfect for text, logos, and illustrations with solid colours.
-
Raster Files (.PNG, .PSD, .TIFF): These are your go-to for photos or designs with complex colour gradients and textures. For raster images, a PNG with a transparent background is non-negotiable. This makes sure only your design gets printed, not a big white box around it. JPEGs, for instance, will always have a solid background and should be avoided at all costs.
Getting this right is crucial for a clean print, so taking a moment for understanding logo file types can save you from some classic printing mistakes.
Final Checks Before You Submit
Before you hit 'send', run through this quick final checklist. Catching a small mistake here can prevent a huge headache later.
-
Outline All Fonts: This is a big one. Convert any text in your design into shapes or "outlines." If you don’t, and the printer doesn't have your specific font installed, their system will swap it for a default one, completely wrecking your design's vibe.
-
Check for Transparency: Double-check that your PNG background is actually transparent. Sometimes, software can leave a faint, off-white haze that you won’t see on screen but will definitely show up on the final shirt.
-
Respect the Safe Area: Your printer will give you a template with a "safe area." Keep all the important stuff—like text and logos—inside these lines. Anything outside might get chopped off during the printing process.
By following these steps, you’re not just sending a file; you’re handing over a professional blueprint that guarantees your vision is brought to life, exactly as you intended.
The Psyque Printing Process From Start to Finish

Ever wondered what happens after you hit ‘order’ on your custom tee? It’s not just a click-and-print job. Getting a digital design onto a physical, wearable piece of art is a carefully tuned process, and at Psyque, we’ve obsessed over every single step to make sure your vision comes to life perfectly.
We’re pulling back the curtain to show you exactly how it’s done. Understanding the journey from file to fabric isn’t just interesting—it shows you why quality matters. It’s more than ink; it’s about dragging your ideas out of the digital ether and into the real world.
Stage 1: Your Design Gets a Pro Check-up
The second your order lands, our work begins. First thing’s first: your design file gets a proper once-over from our team. We don’t just blindly send it to the printer. We analyse it to make sure it’s optimised to look its absolute best.
Our experts are checking for things like resolution, colour accuracy, and transparency. This is our chance to spot and fix any potential gremlins—like pixelation or weird colour shifts—before they ever get near a t-shirt. It's a non-negotiable step that ensures the final print is as sharp and intense as you imagined.
Stage 2: Picking and Prepping the Perfect Canvas
While your design is getting tuned up, we get the garment ready. We pull the exact t-shirt that matches your specs for material, size, and colour. Every single shirt is inspected for any manufacturing flaws before it goes any further.
Next comes the pre-treatment. We apply a special solution that helps the DTF inks grab onto the fabric fibres for good. Think of it like a primer before you paint a wall—it creates the perfect surface for the ink to bond to, locking in durability and making those colours pop.
Stage 3: The DTF Magic Happens
This is where your design is truly born. Using our state-of-the-art Direct-to-Film (DTF) gear, we print your artwork onto a special transfer film. The printer lays down the vibrant coloured ink first, then a base layer of brilliant white ink. That white base is the secret sauce that makes colours explode off the shirt, especially on dark fabrics.
Once printed, we coat the film with a fine adhesive powder that clings only to the wet ink. It’s then sent through a curing unit that melts the powder into a smooth, even adhesive layer. The film, now holding your ready-to-go design, is heat-pressed directly onto the t-shirt, creating a permanent, flexible print that can handle whatever you throw at it. To get a better sense of how this stacks up against other methods, check out our guide on finding the best custom t-shirt printers.
Every single item we produce undergoes a rigorous quality control check. We inspect for print alignment, colour accuracy, and garment integrity before it gets our final seal of approval. This commitment to detail is what sets a Psyque t-shirt apart.
Stage 4: Finishing Touches and Final Inspection
After the design is transferred, we're still not done. The t-shirt goes through one last quality assurance gauntlet. Our team pores over every detail of the print to ensure it meets our ridiculously high standards. We’re checking for perfect adhesion, colour consistency, and a flawless overall finish.
The rise of online services has made getting pro-level quality easier than ever. In fact, the online channel for custom t-shirt printing is the UK market's fastest-growing segment, with a projected compound annual growth rate (CAGR) of 13.3% from 2025 to 2030. It's proof that putting the power to create in your hands works.
Finally, each t-shirt is professionally folded, carefully packaged, and sent on its way to your door. From start to finish, the whole system is built to deliver a product that doesn’t just meet your expectations, but blows them away.
Why Custom T-Shirts Are a Powerful Branding Tool
Let's be honest, a custom t-shirt is way more than just a piece of clothing. It's a walking billboard, a conversation starter, and a seriously powerful asset for any brand worth its salt.
When someone pulls on a shirt with your logo or design, they instantly become a brand ambassador. They carry your message into spaces and conversations you could never reach with traditional ads, creating a kind of genuine, organic exposure that money just can't buy.
Essentially, these shirts make your brand's abstract ideas something real and tangible. For a business, that means crafting a unified, professional look that builds team spirit and makes a solid impression on customers.
Building Identity and Team Cohesion
Branded tees are one of the simplest and most effective ways to build a solid identity for your crew. Whether it’s for a retail team, event staff, or a corporate day out, matching gear immediately signals that you’re a unified, professional force.
It clears up any guesswork for customers and makes employees feel like they’re part of a shared mission. That feeling of belonging can do wonders for morale.
This is just as true for sports teams. Custom kits are non-negotiable for creating that shared identity that fuels pride among players and fans. The demand is real, too. Just look at the Rugby Football Union's 'Impact 25' initiative—backed by over £12 million—which is all about growing women's rugby and, you guessed it, driving the need for more team apparel.
Creating Memorable Events and Promotions
For festivals, charity runs, or product launches, custom t-shirts are absolutely indispensable. They pull double duty, acting as merchandise that can generate revenue and as moving adverts that keep the event's vibe alive long after everyone’s gone home.
A well-designed event tee isn't just a giveaway; it becomes a cherished souvenir, a badge of honour that reminds people of the experience every time they wear it.
A great promotional t-shirt doesn't feel like an advert; it feels like a piece of cool, exclusive merchandise. It turns a marketing giveaway into a sought-after item that people will genuinely want to wear.
If you're using custom t-shirt printing as a branding tool, don't just toss them in a box. How you display your gear matters. Showing off your apparel with a bit of thought can seriously boost its perceived value. Check out these tips on using display stands for clothing to make a bigger impact in a shop or at an event.
Ready to see how custom apparel can level up your own brand? You can get a quote for your custom apparel project and start bringing your ideas to life today.
Got questions about getting custom tees printed? You're not alone. When you're diving into the world of custom t-shirt printing, a few things always come up. From how many you need to order to how to keep your design looking fresh, let's clear the air.
Think of this as the no-nonsense guide to getting your project off the ground.
What’s the Minimum Order?
This really boils down to the printing method. Old-school techniques like screen printing usually come with a minimum order – think around 25-50 shirts. That’s because the setup is a whole process, and it only makes sense financially on bigger runs.
But we do things differently. At Psyque, we use DTF (Direct-to-Film) printing, which has no minimum order quantity. Seriously. If you just want one t-shirt for a gift, a sample to test out, or a personal project, you can get it done without any fuss.
How Long Will My Custom Print Actually Last?
The lifespan of your print depends on two key things: the tech used to print it and how you treat the shirt afterwards. A solid, professional print is built to last.
A well-made DTF or screen-printed design is tough as nails. If you look after it, the print will often outlive the t-shirt itself, lasting for years without fading, peeling, or cracking.
Want to keep your print looking sharp? Just follow these simple rules:
- Wash it inside out. This gives the print a shield against the chaos of your washing machine.
- Use cool water. Hot water is rough on both the fabric and the ink.
- Skip the tumble dryer. Air drying is way gentler and keeps the print from breaking down.
Can I Get a Photo Printed on a T-Shirt?
Yep, absolutely. Printing photos is where modern custom t-shirt printing really shines, especially with methods like DTF and DTG (Direct-to-Garment).
These printers can handle millions of colours and capture every little detail with insane clarity. The one rule? Make sure your image file is high-resolution. You’ll want to aim for 300 DPI (Dots Per Inch) at the size you want it printed, otherwise you risk it looking blurry or pixelated.
What’s the Typical Turnaround Time?
This can change depending on a few things, like the print method, how big your order is, and how complex your design is.
A small, simple DTF order? We can often turn that around in just 3-5 business days. A massive, detailed screen printing job, on the other hand, might take more like 7-10 business days because of all the prep work. If you're on a tight deadline for an event or a launch, it’s always best to check the timeline with your printer first.
Ready to create a t-shirt that actually says something? At Psyque, we live and breathe high-quality DTF printing, bringing your ideas to life with intense colour and prints that last. Start your custom apparel project today
Article created using Outrank
1 comment
You have provided some great insights on custom t-shirt printing. Anyone looking to create high-quality, professional, and long-lasting custom apparel will find the blog useful for explaining design preparation, printing techniques, and fabric choices.