
Your Guide to DTF Heat Transfer Technology
So, what exactly is a DTF heat transfer? Think of it as the most versatile player on the custom apparel team. It’s a modern way to print where your design is first printed onto a special film, coated with a powdered adhesive, and then pressed onto the fabric using heat.
This simple but brilliant process lets you create vibrant, full-colour designs on almost any material you can think of—cotton, polyester, blends, even leather—without having to pre-treat the fabric first. For anyone wanting to produce detailed, durable custom clothing, it’s a total game-changer.
The Evolution of Custom Apparel Decoration
Remember when digital cameras first hit the scene? They completely changed photography, suddenly making it possible for anyone to take amazing photos without needing a darkroom. A DTF heat transfer is having a similar impact on the world of garment printing. It’s making professional, colourful designs accessible to everyone, from home hobbyists to large-scale businesses.
Before DTF came along, your options were pretty limited. Screen printing, for example, required a complicated setup for every single colour, which made small, multi-coloured orders painfully slow and expensive. Heat transfer vinyl (HTV) was decent for simple graphics but couldn't handle fine details or smooth colour gradients. Then there was Direct to Garment (DTG) printing, which offered incredible detail but was notoriously picky about fabrics, working best on cotton.
DTF neatly bridges all these gaps, offering a powerful and incredibly flexible solution. By printing onto a film first, it cleverly sidesteps the limitations of older methods. This isn't just a small step forward; it’s a fundamental shift in how we create custom apparel, putting versatility and efficiency front and centre. If you're curious about the name itself, you can learn more about what DTF stands for and its core principles in our detailed guide.
Why Is DTF Gaining So Much Attention?
The buzz around DTF technology has been impossible to ignore, especially within the UK's fast-moving apparel industry. Its rapid rise is down to a killer combination of quality, flexibility, and simplicity that just works. For small businesses, it smashes the barrier to entry for creating high-quality merchandise. For established printers, it’s a much more efficient way to handle complex, colourful orders.
And it’s not just talk. The data backs it up. Between 2020 and 2024, search interest for DTF printing in the UK shot up by a staggering 7,420%. This explosion in interest shows just how quickly creators and businesses are waking up to its potential.
At its heart, the promise of DTF is simple: create a vibrant, tough, full-colour design that you can press onto almost any fabric. It ditches the messy setup of screen printing and gets around the fabric fussiness of DTG, giving you the best of both worlds.
Here’s why everyone’s jumping on the DTF bandwagon:
- Fabric Versatility: It works beautifully on cotton, polyester, nylon, leather, and blends, opening up a whole world of products you can customise.
- No Colour Limits: DTF can handle photorealistic images, tiny details, and smooth gradients without any extra setup costs per colour.
- Exceptional Durability: The finished prints are soft, stretchy, and can handle dozens of washes without cracking, peeling, or fading.
- Cost-Effective for Small Runs: Unlike screen printing, setting up for a small batch of multi-coloured designs is quick, easy, and affordable.
Essential DTF Printing Equipment and Supplies
Stepping into the world of DTF printing is a bit like setting up a specialist workshop; you need the right tools and materials to get the job done properly. This section is your no-nonsense guide to building a DTF setup that cranks out consistent, top-quality results, whether you're a hobbyist or launching a business.
Think of the DTF process as a production line. From the moment you hit 'print' to the final press onto a garment, each piece of equipment has a crucial role to play. Getting to grips with what each component does is the first step towards making a smart investment.
The Core Machinery Lineup
Your main outlay will be the hardware that brings your digital designs into the physical world. These are the workhorses of any DTF operation, handling the printing, adhesive application, and curing.
-
DTF Printer: This isn't your average desktop printer. A dedicated DTF printer is built to handle specific pigment-based inks and print directly onto rolls of PET film. Its most important feature is the ability to lay down a white ink base, which is absolutely vital for making your colours look vibrant and opaque on dark-coloured fabrics. For a deeper dive, check out our detailed guide on choosing the right DTF printing machine.
-
Powder Shaker: Once your design is printed, it needs an even coating of adhesive powder. You can do this by hand for one-off jobs, but an automatic powder shaker is a total game-changer for anyone doing this at scale. The machine coats the wet ink with powder and shakes off the excess, leaving a clean, uniform adhesive layer every time.
-
Curing Oven: The powder-coated film then makes its way into a curing oven or tunnel dryer. This piece of kit melts the adhesive powder, fusing it to the ink to create a stable, ready-to-press transfer. Nailing the temperature control here is critical – under-cure it and the transfer won't stick properly, but over-cure it and you'll end up with a stiff, plastic-like feel.
-
Heat Press: This is where the magic happens. A good-quality heat press applies the perfect mix of heat, pressure, and time to transfer the design from the film to the fabric. Look for a press with even heat distribution across the platen and accurate digital controls. It's the one piece of equipment you really don't want to skimp on.
Essential Consumables and Supplies
Alongside the machinery, you'll need a steady stream of quality consumables. The calibre of these materials has a direct impact on the look, feel, and durability of your finished prints. They are the essential ingredients in your DTF recipe, and using the good stuff is what ensures your final products are vibrant, long-lasting, and feel great – the kind of quality that keeps customers coming back for more.
Here's a quick look at the core equipment and consumables you'll need to get started with DTF heat transfers.
Essential DTF Heat Transfer Equipment Checklist
| Component | Function | Key Feature to Consider |
|---|---|---|
| PET Film | The special carrier sheet where your design is printed before being transferred. | Look for a film with good ink absorption and a quality coating for a clean peel (hot or cold peel options). |
| DTF Inks | Specially formulated water-based pigment inks (Cyan, Magenta, Yellow, Black, and White). | Go for inks known for high colour vibrancy and excellent wash fastness to stop designs from fading. |
| Adhesive Powder | A fine, hot-melt polyurethane powder that acts as the "glue," bonding the ink to the fabric. | Comes in different grades (fine to coarse) to suit various fabric types and desired finishes. |
| RIP Software | Raster Image Processor software that controls the printer, managing ink levels, colour profiles, and the white base layer. | Crucial for accurate colours and efficient ink use. Most good DTF printers will come with this bundled. |
Getting these components right from the start sets a solid foundation for your printing operation.
The quality of your DTF heat transfer is only as strong as its weakest link. Investing in reliable machinery and premium consumables from the start will save you time, reduce waste, and ensure your finished garments meet professional standards.
The growth of this technology in the UK has been nothing short of remarkable. The UK direct-to-film printing market was valued at around USD 192.2 million in 2025, and it's projected to hit USD 249.0 million by 2030. This boom is all down to DTF’s flexibility and efficiency, with dedicated DTF printers accounting for a massive 45.01% of the market's revenue in 2024. You can discover more insights about these DTF printing trends and see the full market breakdown.
The Step-by-Step DTF Heat Transfer Process
Turning a digital file into a vibrant, wearable piece of art might sound like magic, but the DTF heat transfer process is surprisingly straightforward. It’s a lot like following a precise recipe, where each step builds on the last to create something amazing. Let’s walk through the entire journey, from prepping your artwork on the screen to that final, satisfying press.
Before you dive in, it’s a good idea to get comfortable with some basic graphic concepts. A solid grasp of things like understanding vector vs raster graphics is crucial, as the quality and sharpness of your final print hang on the type of file you start with. A high-resolution file is your foundation for a professional finish.
Step 1: Prepare Your Digital Design
Everything begins on your computer. Before any ink hits the film, your artwork needs to be prepped and ready to go. This means making sure your design file is set to the correct size, has a crisp resolution (aim for 300 DPI), and is saved in a format like PNG with a transparent background.
This is where your RIP (Raster Image Processor) software comes into play. Think of this program as the translator between your design file and the DTF printer. It’s responsible for managing colour accuracy and, most importantly, creating the white ink base layer that goes under your colours. This white undercoat is what makes your design pop, especially on darker fabrics.
Step 2: Print Your Design on PET Film
With the digital prep work done, it's time to print. You’ll load a sheet or roll of special PET (Polyethylene Terephthalate) film into your DTF printer. This isn’t just any old plastic; it’s treated with a special coating that’s designed to grab onto the DTF inks and then release them perfectly when heat is applied.
The printer lays down the CMYK colours of your design first, but as a mirror image. Right after that, it prints a perfectly aligned layer of white ink directly on top. This colour-then-white sequence is the secret sauce that makes DTF so effective on any colour of garment.
Step 3: Apply the Adhesive Powder
As soon as the design comes out of the printer with the ink still wet, it’s time to apply the hot-melt adhesive powder. This fine, white powder is the magic ingredient that acts as a heat-activated glue, ensuring your design bonds permanently to the fabric.
If you’re just starting out, you can do this by hand, simply sprinkling the powder over the wet ink. For more consistent and efficient results, though, most pros use an automatic powder shaker. This machine coats the entire design evenly and then gently vibrates to shake off any excess, so the adhesive only sticks where the ink is.
This infographic shows the typical workflow for a DTF heat transfer, from the initial print to the final press.
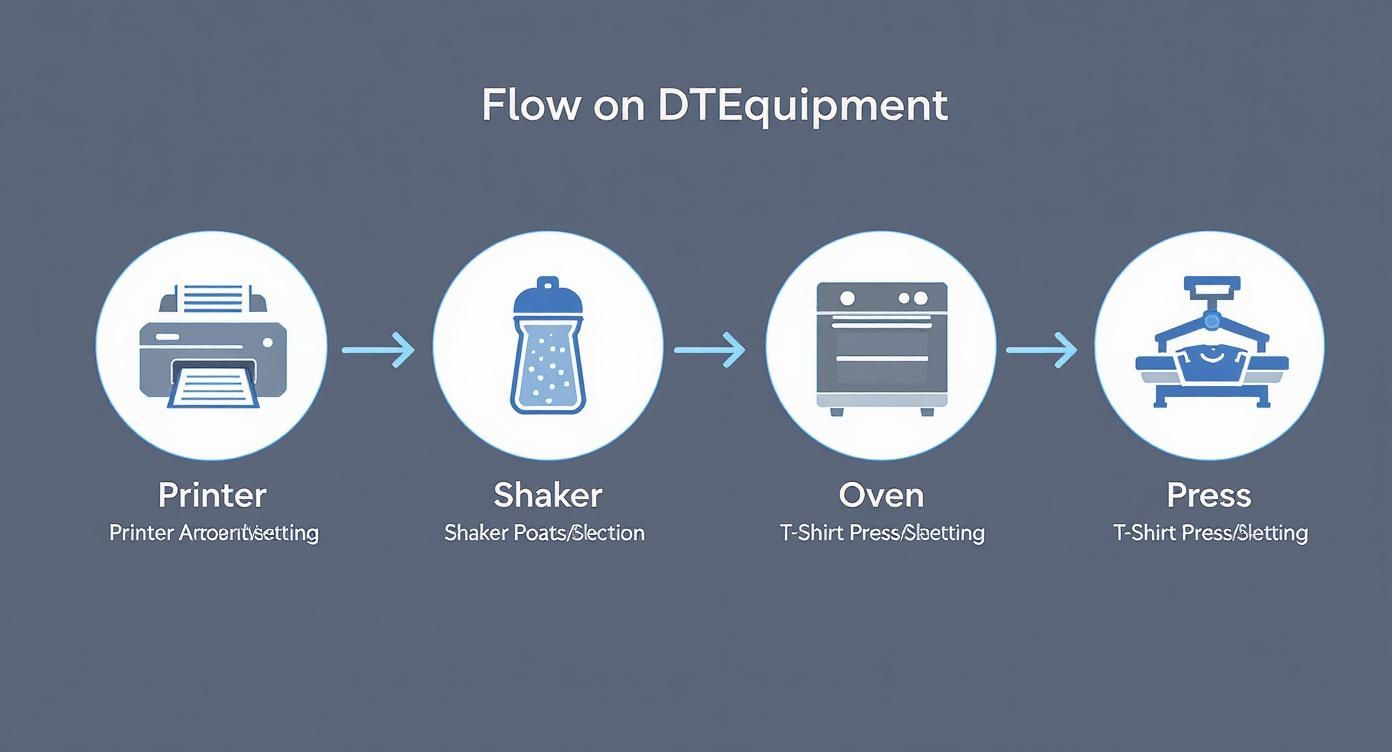
You can see how each piece of equipment—the printer, shaker, oven, and press—works together in a seamless production line.
Step 4: Cure the Powdered Transfer
With the powder applied, the film heads to the curing stage. The whole point here is to melt that adhesive powder and fuse it with the wet ink, creating a single, solid transfer. This is usually done in a small curing oven or a tunnel dryer.
The film is heated to around 100-120°C (212-248°F) for two or three minutes. This process gels the powder, turning it from a loose coating into a smooth, almost rubbery film on the back of your design. What you have now is a finished, ready-to-use DTF transfer that can be pressed immediately or stored for months.
Pro Tip: Getting the curing just right is critical. If you under-cure it, the powder won't fully melt, leading to poor adhesion on the shirt. But if you overheat it, the oils from the ink can bleed out and make your final print look greasy.
Step 5: Press the Transfer onto the Fabric
This is the final and most rewarding step. First, place your garment on the heat press and give it a quick "pre-press" for 5-10 seconds. This gets rid of any moisture or wrinkles and gives you a perfectly flat surface to work with.
Now, position your cured DTF transfer on the garment with the design facing down. It’s time to press it, using the right settings for your material.
- For Cotton: A good starting point is 160-170°C (320-338°F) for about 15-20 seconds.
- For Polyester and Blends: Go a little cooler, around 140-150°C (284-302°F) for 10-15 seconds.
After the timer goes off, it's time for the peel. The type of film you're using—hot peel or cold peel—determines when you remove the backing. Hot peel comes off right away, while cold peel needs to cool down completely first. For a deeper dive into different methods and applications, our guide to DTF transfer printing has you covered.
As a final touch, many professionals do a quick second press for 5-10 seconds after peeling, usually with a Teflon sheet or parchment paper over the design. This helps embed the print right into the fabric's fibres, making it more durable and giving it a softer, matte finish. And just like that, your custom garment is ready.
Why DTF Is a Superior Choice for Many Projects
When you're looking to print on clothing, the choices can feel a bit overwhelming. You’ve got the old-school reliability of screen printing, the craft-friendly nature of heat transfer vinyl (HTV), and the modern magic of Direct to Garment (DTG). Yet, time and again, DTF heat transfer emerges as the go-to solution for a massive range of projects.
DTF’s real strength is how it cherry-picks the best bits from other methods while leaving their biggest headaches behind. Think of it as a hybrid: you get the incredible, full-colour detail of DTG, the fabric freedom of HTV, and the kind of durability you’d expect from screen printing—all rolled into one efficient process.
This unique mix makes DTF a game-changer for small businesses, creative brands, and even larger operations wanting to streamline their production. It gets rid of many of the usual compromises you have to make when creating custom gear.
Unmatched Versatility Across Fabrics
Let’s be honest, one of the biggest frustrations with other printing methods is how picky they are about fabrics. DTG, for instance, looks fantastic on 100% cotton but can get a bit patchy on polyester or blends. DTF, on the other hand, just isn’t fussy.
The secret is that the design is printed onto a special film and bonded with an adhesive powder first. This creates a self-contained transfer that’s ready to go on pretty much any material that can take the heat from a press.
- Natural Fibres: Perfect for cotton, linen, and canvas.
- Synthetic Materials: Works brilliantly on tricky fabrics like polyester, nylon, and spandex.
- Blended Fabrics: No problem at all with popular cotton/poly blends.
- Beyond Apparel: You can even press DTF transfers onto harder surfaces like leather or wood.
This incredible flexibility is what sets it apart. Whether it's a polyester sports jersey or a classic cotton tee, DTF handles it without needing special pre-treatments, which helps keep production simple and costs down.
Superior Durability and Feel
A great print isn't just about how it looks on day one; it's about how it feels to wear and how it stands up to life. We’ve all had those t-shirts with a stiff, plastic-like design that cracks and peels after a few spins in the washing machine. DTF was designed to solve that exact problem.
The water-based inks and flexible hot-melt adhesive work together to create a print that bonds into the fabric's fibres. The result is a transfer that feels incredibly soft and has a remarkable amount of stretch. It moves with the garment, which prevents the cracking you often see with thicker, more rigid prints.
With the right care, a quality DTF design can easily handle 50+ washes without losing its punch.
Vibrant Colours and Fine Detail Reproduction
This is where DTF truly shines. It excels at bringing complex, photorealistic designs to life with jaw-dropping clarity. Because the image is laid down on film first, it can capture a level of detail that’s tough for other methods to match. The process uses a standard CMYK colour model, but it’s all built on a crisp, white ink underbase.
That white ink layer is the magic ingredient. It acts like a primer, making sure every single colour pops with brightness and opacity, whether you’re printing on a white t-shirt or a black hoodie.
This foundation means you can have:
- Unlimited Colours: Forget simplifying your artwork or paying extra for each screen, which is standard in screen printing.
- Photorealistic Images: Reproduce high-resolution photos with incredible accuracy.
- Fine Lines and Small Text: Print intricate details and sharp text without it blurring or bleeding.
For anyone wanting to produce seriously eye-catching merch, this is a massive plus. To see how it compares to the traditional approach, check out our guide on DTF vs screen printing. By removing the limits on colour, DTF opens up a whole new world of creative possibilities.
DTF vs DTG vs Screen Printing: A Quick Comparison
To help you decide which method is right for you, we’ve put together a quick comparison table. Each technique has its place, but this should give you a clear idea of where DTF really pulls ahead.
| Feature | DTF Heat Transfer | DTG Printing | Screen Printing |
|---|---|---|---|
| Fabric Versatility | Excellent (cotton, poly, blends, leather, nylon) | Good (best on 100% cotton, struggles with synthetics) | Good (versatile, but inks may need changing for different fabrics) |
| Colour & Detail | Excellent (full colour, photorealistic, fine lines) | Excellent (full colour, great for photos) | Limited (cost increases with each colour, less detail) |
| Feel & Durability | Soft, flexible, and very durable (50+ washes) | Very soft (ink soaks into fabric), good durability | Can be thick, very durable once cured |
| Setup Costs | Low (no screens or complex pre-treatment) | Moderate (printer and pre-treatment machine) | High (screens needed for each colour) |
| Best For | Small to medium runs, full-colour designs, varied fabrics | On-demand printing, complex designs on cotton | Large bulk orders, simple designs with few colours |
As you can see, while DTG and screen printing are fantastic for specific jobs, DTF offers a powerful, all-round solution that ticks a lot of boxes for modern printing needs.
How to Solve Common DTF Printing Issues
Even with the most organised setup, a dtf heat transfer can sometimes throw you a curveball. Just like any craft, getting the hang of DTF printing means you'll have to do a bit of troubleshooting along the way. This guide is designed to help you quickly figure out what's gone wrong and fix it, saving you from wasted materials and that feeling of frustration.
We'll break down the most common problems into a simple 'problem and solution' format, giving you direct, actionable advice. Think of this as your go-to manual for getting over those early hurdles and achieving flawless, professional-quality results every single time. With these tips, you'll spend less time guessing and more time printing.
Solving Adhesion and Peeling Problems
One of the biggest headaches is a transfer that just won’t stick properly or starts lifting at the edges right after pressing. This almost always boils down to an issue with heat, pressure, or time—the three pillars of a perfect press.
Problem: The design doesn't fully stick to the garment, or it lifts off when you try to peel the film.
Solution: The first thing to check is your heat press settings. Is the temperature and time correct for the specific fabric you're using? It's also vital to pre-press the garment for 5-10 seconds to get rid of any moisture, which is a notorious culprit for adhesion failure. You'll also want to make sure your press is applying firm, even pressure across the entire design. If the pressure is patchy, your results will be too.
If you’re still having trouble, the problem might be at the curing stage. Under-cured adhesive powder won't create a strong enough bond to the fabric. Try nudging up your curing time or temperature just a little to make sure the powder is fully melted before it even gets to the press.
Tackling Ink Bleeding and Colour Issues
There’s nothing more disappointing than seeing a vibrant design on your screen turn into a blurry, discoloured mess on the final garment. Ink bleeding or wonky colours can ruin an otherwise perfect piece, but these issues are usually straightforward to fix.
Problem: The edges of your design look fuzzy, or the colours look dull or different from your original file.
Solution: Ink bleeding often shows up as a sort of halo or an "oily" look around the print. This is typically a sign that you've over-cured the adhesive powder. Too much heat can cause the oils in the ink to separate. Try dialling back the curing temperature or shortening the time to find that sweet spot.
When it comes to colour inaccuracy, the fix is almost always in your RIP software.
- Check Colour Profiles: Make sure you’re using the correct ICC profile for your specific printer, ink, and film combination. The right profile makes all the difference.
- Adjust Ink Limits: Sometimes, the printer is simply laying down too much ink. Reducing the ink density in your RIP settings can sharpen up details and bring your colours back to life.
If you find yourself consistently wrestling with printing your own transfers, there's always the option of using pre-made ones. You can find out more about the benefits of using DTF transfers ready to press, which can save a lot of time and guarantee a professional finish.
Dealing with a Powdery or Rough Texture
The final print should feel smooth and almost become one with the fabric. If your finished dtf heat transfer feels rough, gritty, or has a powdery residue, the issue probably happened during the adhesive powder step.
Problem: The finished print feels rough to the touch, or you can see tiny white specks of powder around the design.
Solution: This is a classic sign that excess adhesive powder wasn't shaken off properly before curing. After coating the film, give it a good flick or a few gentle taps to dislodge any loose particles that aren't stuck to the ink. This is where an automatic powder shaker really shines, as it vibrates off the excess powder consistently every time.
It's also crucial to store your adhesive powder in a dry, airtight container. If moisture gets in, it can cause the powder to clump and stick where it shouldn't, leading to that unwanted texture.
Your DTF Heat Transfer Questions Answered
Even with a solid guide, it's natural to have a few questions about how dtf heat transfers work in the real world. This section is designed to clear up any lingering uncertainties and answer the most common queries we get from creators just like you. Think of it as your go-to reference for mastering the finer points.
How Durable Are DTF Transfers on Garments?
When applied correctly, DTF transfers are incredibly tough. You can expect them to last for 50 or more washes without showing signs of cracking, peeling, or fading. It’s a seriously impressive lifespan.
This durability comes down to the clever combination of flexible, water-based inks and a powerful hot melt adhesive. The finished print actually becomes one with the fabric, stretching and moving with it. This completely avoids the stiff, cracked feel you might have seen with older, less advanced transfer methods. To keep your designs looking fresh for years, just wash the garment inside out in cool water and steer clear of high-heat tumble drying.
Can I Use a Regular Printer for DTF Transfers?
In a word, no. You can't use your standard home or office inkjet printer for DTF. The whole process hinges on a specialised printer that's been built or modified to handle PET film and a very specific set of textile inks. The most critical part is the white ink layer, which simply isn't a feature of regular printers. This white base is essential for making colours pop on dark fabrics.
A normal printer just doesn't have the right printhead, ink system, or chemistry to do the job. Trying to force it would not only fail to produce a transfer but would likely cause serious damage to your machine.
The secret to DTF's vibrant look on any colour garment is its unique ink system. The white ink base works just like a painter's primer on a dark wall—it ensures any colours layered on top are bright and true, instead of getting lost in the fabric.
What Is the Difference Between Cold and Hot Peel Film?
The main difference is all in the timing—it’s about when you peel the backing film away after pressing. Your choice will likely come down to how you work, how fast you need to be, and the finish you're after.
- Hot Peel Film: This one is designed for speed. You remove the film immediately after pressing, while the transfer is still piping hot. It’s perfect for high-volume jobs where every second counts.
- Cold Peel Film: With this type, you need a bit of patience. You have to wait for both the garment and the transfer to cool down completely before peeling the film off. Many people, especially beginners, find cold peel more forgiving. It often leaves a beautifully smooth, matte finish because the adhesive has had more time to settle deep into the fabric's fibres.
Does DTF Work Well for Small, Detailed Text?
Absolutely. DTF is a fantastic choice for designs with fine lines and intricate, small text. Because the design is first printed onto a perfectly smooth film, it can capture much sharper detail than methods where ink goes directly onto a textured fabric, like traditional screen printing.
This precision makes the dtf heat transfer process ideal for printing things like company logos with tiny taglines, complex illustrations, or even care instructions directly onto a garment without losing any clarity. Those crisp, clean edges are one of the biggest wins for this technology.
Ready to see your own vibrant, durable designs come to life? At Psyque - DTF Print & Press, we live and breathe top-quality custom apparel using the latest DTF technology. Check out our collections or get in touch for a custom project at https://psyque.co.uk.