
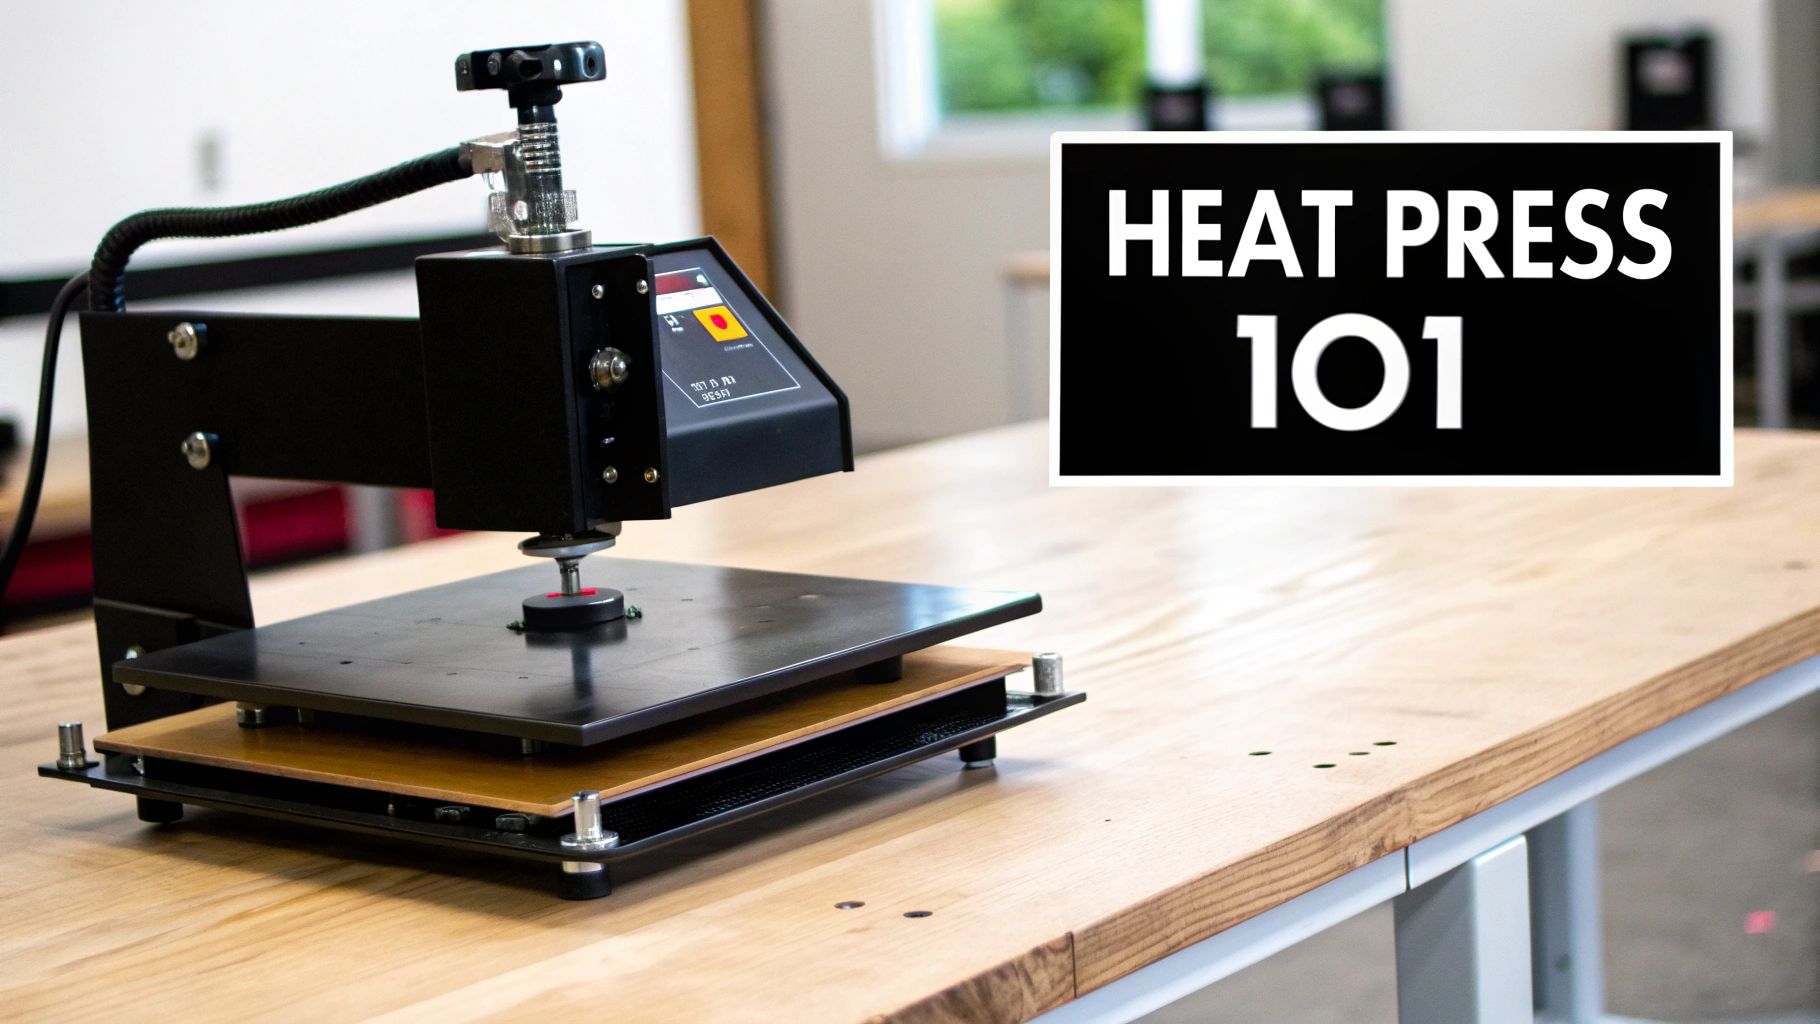
Your Guide to Using a Heat Press Machine for Shirts
Ever wondered how those cool, custom-printed shirts get their designs? More often than not, the secret weapon is a heat press machine for shirts. You can think of it as a super-powered, professional-grade iron, built specifically to apply designs onto fabric with perfect precision.
It's the tool that permanently bonds graphics—like DTF transfers, vinyl cut-outs, or sublimation prints—onto a garment. The result is a sharp, durable finish that can handle wash after wash.
What Is a Heat Press Machine?
At its core, a heat press is a fairly straightforward piece of kit. It’s made up of two flat plates, called platens. The top platen gets incredibly hot—to a very specific temperature you set—while the bottom one acts as a sturdy, flat base for your shirt.
You simply place your garment and design between the platens, close the machine, and it applies consistent heat and even pressure across the entire surface. This powerful combo is exactly what your standard household iron can't deliver. An iron’s heat fluctuates, and the pressure is never even, which is why you end up with peeling designs and patchy results. A heat press nails it every single time, making it essential for anyone serious about creating custom clothing.
The Core Function of a Heat Press
The main job of a heat press is to activate the adhesive on a transfer, melting it just enough to permanently fuse it into the fabric's fibres. This is the crucial step for creating professional-quality products that not only look fantastic but are built to last.
Whether you're a hobbyist making a few tees for friends or a small business churning out merchandise, this machine is what turns a digital design into a real, wearable product. This process has made high-quality printing accessible to everyone, allowing creators to produce designs that are just as vibrant and durable as those from massive factories. If you want to dive deeper into the different methods, check out our complete guide to heat transfer printing.
A heat press machine for shirts isn’t just a tool; it's a small-scale factory. It gives you the power to create professional, saleable garments from your own workshop, turning creative ideas into tangible, profitable products with precision and consistency.
Why It Is the Go-To Tool
The sheer reliability of a heat press is why it’s loved by everyone from DIY crafters to big commercial print shops. This one machine guarantees that every single shirt you make hits the same high standard. Here are the key benefits that make it so indispensable:
- Precision Control: You can dial in the exact temperature, time, and pressure needed for different fabrics and transfers, which takes all the guesswork out of the equation.
- Even Application: The clamshell or swing-away design ensures heat and pressure are spread perfectly across the whole design. No more weak spots or peeling corners.
- Durability: By properly curing the transfer, a heat press creates a bond that can withstand dozens of washes without cracking, fading, or peeling away.
- Efficiency: It’s worlds faster than faffing about with an iron, letting you produce more shirts in far less time.
Ultimately, a heat press is the cornerstone of modern custom apparel. It gives you the control and power needed to achieve flawless results, every single time.
Comparing the Different Types of Heat Press Machines

Choosing the right heat press machine for shirts is a massive step. The style of machine you go for will directly shape your workflow, how much space you need, and even the kinds of products you can create. It's a bit like choosing a vehicle; a small city car is perfect for zipping around town, but you'll need a van if you're hauling furniture. Each heat press is built with a different job in mind.
You'll mainly come across three designs: the Clamshell, the Swing-Away, and the Draw press. Getting to grips with what makes them tick is the key to making a smart decision. This will help you find a machine that fits your creative ambitions and the practical reality of your workspace, whether that's a corner of a spare room or a dedicated print shop.
The Compact Clamshell Press
For many creators, the Clamshell is their first love. The design is brilliantly simple—it opens and shuts just like a clam's shell. The top platen is on a hinge, lifting straight up so you can arrange your shirt and transfer on the platen below.
This straightforward, single-motion action makes it super quick and efficient for standard t-shirt jobs. But its real selling point is its small footprint. Because the top platen doesn't swing out, it needs very little space around it, making it an absolute winner for small workshops, home businesses, or craft rooms where every inch counts.
In the UK, these compact and affordable models are popping up everywhere in SMEs and home setups. They pulled in about 40% of global revenue, showing just how popular they are for start-ups and anyone tight on space.
The Clamshell is the sprinter of the heat press world. It’s quick, efficient, and perfect for straightforward jobs like t-shirts. Its compact design makes it an ideal starting point for anyone with limited space.
The Versatile Swing-Away Press
Next up, we have the Swing-Away press. The name gives it away: the top heat platen lifts up and then swings completely clear of the bottom platen, usually off to the side. This design has one massive advantage: unobstructed access to your entire workspace.
With that hot platen moved safely out of the way, you get a perfect, clear view of your garment. This makes lining up transfers a doddle, especially if you're working on intricate designs with multiple parts. It also drastically cuts down the risk of accidentally brushing against a scorching hot surface while you're concentrating.
The trade-off? It needs a bigger operational footprint. You have to make sure there's enough room for that top platen to swing out fully without hitting anything. These presses are also fantastic for thicker items like hoodies, ceramic tiles, or plaques, as they tend to apply more even pressure across those bulkier surfaces.
The Efficient Draw Press
The Draw press is a clever hybrid of the other two. With this design, the top platen stays put while the bottom platen slides out towards you like a drawer. This gives you the same easy, open access to your layout area as a swing-away, but without needing all that extra space at the side.
It's a brilliant solution for workshops where space is a premium but you still want the safety and convenience of working on an open platen. By bringing the workspace to you, it also creates a more comfortable, ergonomic setup and stops you from having to awkwardly reach over the machine.
Feature Comparison of Heat Press Machine Types
To make the choice a little clearer, let's break down the main differences in a simple table. Looking at them side-by-side can really help you pinpoint which features matter most for your specific needs.
| Feature | Clamshell Press | Swing-Away Press | Draw Press |
|---|---|---|---|
| Footprint | Very small, requires minimal side clearance. | Large, needs significant side clearance to swing. | Medium, needs front clearance but no side room. |
| Workspace Access | Limited, requires reaching under the hot top platen. | Excellent, clear and unobstructed view of the base. | Excellent, base slides out for easy, safe access. |
| Best For | High-volume t-shirts, beginners, small spaces. | Thicker items, complex layouts, safety-conscious users. | Workshops with limited side space, ergonomic setups. |
| Ease of Use | Very simple, single-motion operation. | Requires two motions (lift and swing). | Simple slide-out motion. |
| Portability | Generally lighter and more portable. | Heavier and bulkier due to the swing mechanism. | Heavier than clamshells, less portable. |
| Even Pressure | Good for thin items, can be uneven on thick items. | Very even pressure, ideal for thick or rigid items. | Very even pressure, similar to a swing-away. |
Ultimately, if you're planning on printing a wide range of items, especially specialty products that need careful placement, a Draw or Swing-Away model is often a better long-term investment. They're also incredibly versatile for different printing methods, which you can read more about in our guide on choosing a heat press for sublimation.
Mastering the Golden Triangle of Heat, Time and Pressure
Think of it like baking a perfect cake. If the oven’s too hot, you get a burnt mess. Too cool, and it stays a gooey disaster. Not enough time and it's raw in the middle; too much and it’s dry as a bone. That same logic is exactly what we’re dealing with when using a heat press machine for shirts. The secret to a flawless, professional-looking print is mastering the ‘golden triangle’—temperature, time, and pressure.
Getting this delicate balance spot-on is everything. These three elements are the magic ingredients that work together to cure the ink from a DTF (Direct to Film) transfer, permanently bonding it deep into the fabric fibres. When they’re all working in harmony, you get a design that’s vibrant, buttery-soft to the touch, and tough enough to last through countless washes.
Understanding Temperature Settings
Temperature is the first, and maybe the most crucial, corner of our triangle. It's the heat that activates the adhesive on the back of your DTF transfer, letting it melt just enough to fuse with the garment. The right temperature isn't a one-size-fits-all number; it depends entirely on the fabric you’re pressing and the specific transfer film you're using.
Different materials handle heat in very different ways. For instance:
- Cotton: This is a tough, natural fibre that can take higher heat, usually around 150-160°C.
- Polyester: As a synthetic, polyester is much more sensitive to heat. Too high and it can scorch or even melt. A lower setting, typically 120-140°C, is the safe bet here.
- Blends (e.g., 50/50 Cotton/Poly): For these, you need to find a happy medium that’s hot enough for the cotton but gentle enough for the polyester. The sweet spot is often in the 140-150°C range.
One of the most common mistakes beginners make is setting the temperature too low. The design might look like it’s stuck on perfectly at first, but it'll probably start to peel or crack after its first trip through the washing machine because the adhesive never fully cured.
Dialling In the Perfect Time
Time is the second side of the triangle, and it’s all about how long you apply that heat and pressure. Just like with temperature, getting the timing right is critical for creating a permanent bond without accidentally damaging the shirt.
Press for too little time, and the transfer simply won't stick properly. On the flip side, press for too long, and you risk scorching the fabric—leaving that dreaded faint yellow or brown box around your design—or over-curing the ink, which can make it feel brittle and rough.
A heat press isn’t just about heat; it’s about managing a controlled chemical reaction. Time is the catalyst. You need just enough to finish the job without burning your project.
This is exactly why following your DTF transfer supplier’s instructions is so important. At Psyque, our DTF transfers are designed to work within specific time and temperature windows to guarantee the best results every single time. For a deeper dive into settings for different materials, take a look at our comprehensive heat press temperature guide.
Applying the Right Amount of Pressure
Pressure is the final, and often most overlooked, piece of the puzzle. It’s the physical force that pushes the melted adhesive down into the weave of the fabric, ensuring you get a deep, even bond across every inch of your design. Get the pressure wrong, and you'll end up with patchy, unprofessional results.
Most heat presses let you adjust the pressure, usually with simple settings like light, medium, or firm.
- Too little pressure: The transfer won’t make full contact with the shirt, leaving parts of the design poorly stuck down and ready to peel off.
- Too much pressure: This can squish the ink out, causing it to spread and lose its crisp, sharp edges. It can also leave a very noticeable "press box" outline on the garment itself.
For the vast majority of DTF applications on t-shirts, a medium to firm pressure is what you're aiming for. You should feel a good bit of resistance when you close the press, but you shouldn't have to wrestle with it to get it locked down.
The growing importance of these machines is clear. Heat transfer printing offers the kind of vibrant, durable prints on all sorts of fabrics that UK apparel brands and marketing agencies love. It's no surprise the global market for these machines is set to grow at a 5.9% CAGR, tracking right alongside the UK’s own textile sector growth. You can find more insights on the heat transfer printing machine market over at cognitivemarketresearch.com.
The Golden Rule: Test Before You Press
Here's the thing: every heat press has its own quirks, and even t-shirts from the same pack can behave differently. That’s why the single most important habit you can build is to always, always perform a test press. Before you commit to your final, perfect garment, grab a scrap piece of the same material or find a hidden spot to test your settings. This tiny step is the one thing that can save you from ruining a whole batch of shirts and help you nail that perfect finish, every single time.
How to Choose the Right Machine for Your Business
Choosing the right heat press machine for shirts can feel like a huge commitment, but it doesn’t have to be overwhelming. The trick is to tune out the noise and focus on what actually matters for your goals. The perfect machine for a weekend crafter looks completely different from what a high-volume professional print shop needs.
To help cut through the confusion, we've broken the decision down into three distinct profiles. Find the category you fit into, and you can build a simple checklist of must-have features. This way, you invest in a machine that not only works for you now but is also ready to grow with you.
The Passionate DIY Hobbyist
If you’re making shirts for family, friends, or just for fun, your priorities will probably be your budget, the space you have, and how easy the machine is to use. You simply don't need a heavy-duty industrial beast to bring your creative ideas to life.
For most hobbyists, a compact clamshell model is the perfect place to start. It gives you a fantastic balance of performance and affordability without taking over your entire craft room.
Your Feature Checklist:
- Compact Size: Look for a machine with a small footprint that’s easy to store. A platen size around 23cm x 30cm is usually more than enough for most personal projects.
- Budget-Friendly: You shouldn't have to break the bank. A reliable entry-level machine will give you excellent results for personal use.
- Simple Controls: An intuitive digital display for time and temperature is a must. You want to spend your time creating, not trying to figure out a complicated manual.
- Lightweight and Portable: While it might not be a deal-breaker, a lighter machine is much easier to move around and tuck away when you're not using it.
The Growing Small Business Owner
As a small business owner, your focus shifts towards consistency, efficiency, and being able to offer more than just one product. You're creating items to sell, so every single shirt needs to meet a professional standard. Your machine is a core part of your business, which means reliability is non-negotiable.
You need a heat press that can handle being used over and over again while delivering the same great results every single time. This is where features like even heat distribution and accurate temperature control become absolutely critical.
Your Feature Checklist:
- Consistent Heat Distribution: Look for machines known for getting rid of cold spots across the platen. This ensures every part of your transfer sticks perfectly.
- Accurate Digital Controls: Precise and reliable timers and temperature gauges are essential for getting the same results across different batches.
- Durable Construction: A solid, well-built frame is a good sign that a machine is designed to handle the demands of a growing business.
- Interchangeable Platens: The ability to swap out the main platen for smaller ones (for sleeves, labels, or kids' clothes) opens up a whole new world of products you can offer.
This infographic breaks down the essential trio of settings that every business owner must master for the perfect press.
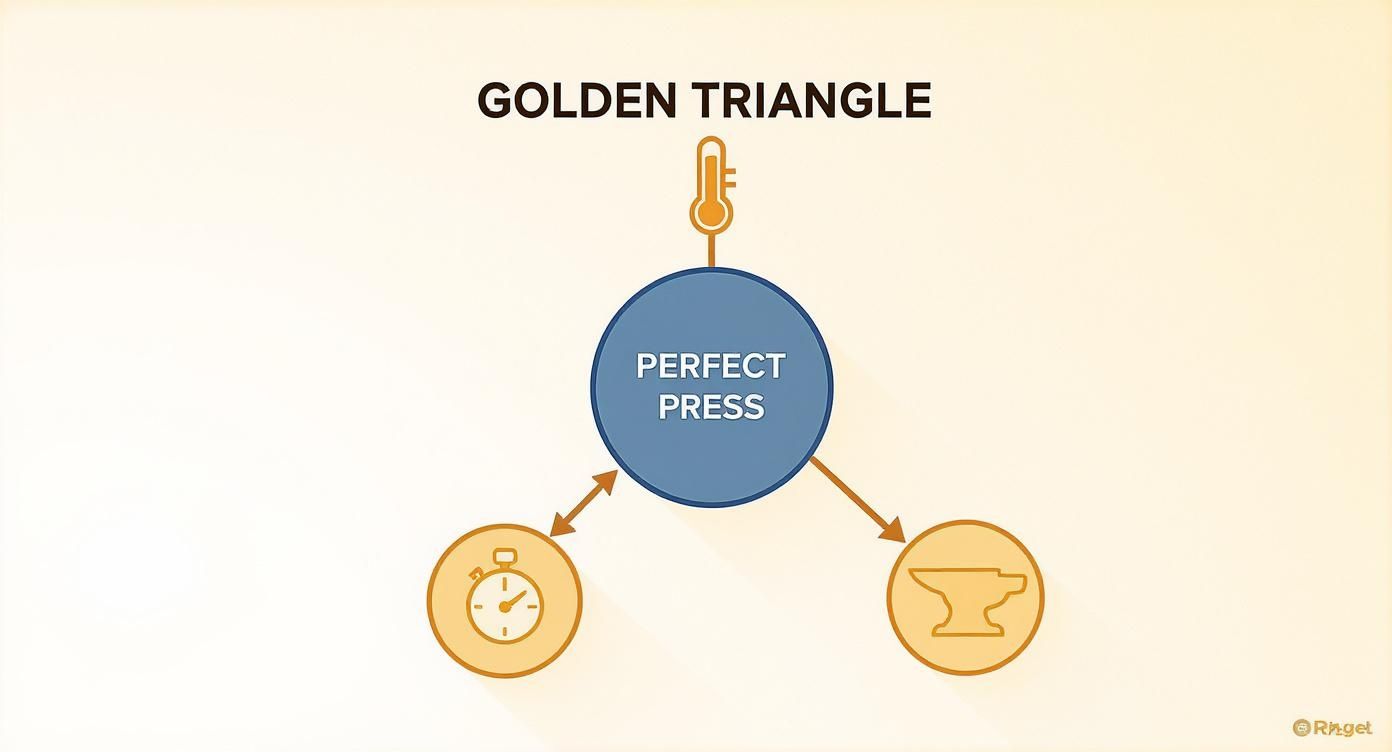
Getting the relationship between temperature, time, and pressure just right is the key to producing high-quality, durable garments that your customers will love.
The High-Volume Professional Print Shop
For a professional print shop, it's all about maximising output, minimising downtime, and keeping your operators safe. The machine has to be a real workhorse, capable of running for hours on end while churning out flawless results at speed.
At this level, automatic features and heavy-duty construction aren't just luxuries—they're essential for staying profitable and efficient. Investing in a high-end machine pays for itself through increased productivity and less manual effort.
Your Feature Checklist:
- Automatic Opening: An auto-open feature stops you from over-pressing and lets the operator get the next shirt ready while the current one is pressing.
- Pneumatic or Hydraulic Pressure: These systems give you effortless, perfectly even pressure with the push of a button, which means less tired staff.
- Heavy-Duty Build: Look for industrial-grade materials and construction designed for constant, tough use.
- Advanced Control Panel: The ability to save preset settings for different jobs streamlines your workflow and guarantees consistency across your whole team.
Once you've kitted your business out with the right heat press, looking into modern sales channels can seriously boost your reach. For anyone ready to scale up, learning how to sell products on TikTok is a great next step. And for more help on picking the right equipment, check out our detailed buyer's guide for a UK heat press machine.
Your Step-by-Step Guide to Pressing a Perfect Shirt
 Alright, enough with the theory—let's get our hands dirty and put that heat press machine for shirts to work. This simple guide will walk you through the whole process, step by step. If you follow this workflow, you'll be knocking out flawless, professional-looking prints right from your very first go.
Step 1: Prepare Your Machine and Garment
First things first, switch on your heat press. You’ll need to set the temperature and time based on your specific DTF transfer and the fabric you're using. Always double-check your supplier's guidelines, as this is one of the most important steps.
While the machine is warming up, get your shirt ready. Lay it out flat on the lower platen, making sure it’s completely smooth. Wrinkles are the number one enemy of a good transfer, so spend a moment pulling out any creases. A totally flat surface is non-negotiable for getting that even pressure.
Once your press is up to temperature, it’s time for a "pre-press." Just close the press on the empty shirt for about 5-10 seconds.
Think of the pre-press as your secret weapon. It zaps out any lingering moisture and gets rid of any leftover chemicals from the manufacturing process. This creates a perfect, smooth canvas for your DTF transfer's adhesive to grab onto.
Step 2: Position Your Design
With the pre-press done, you can now focus on getting your design in the right spot. Here’s a quick tip for finding the centre: fold the shirt in half vertically and give it a quick, light press to make a temporary crease. When you unfold it, you'll have a perfect line to guide you.
Carefully place your DTF transfer onto the shirt, adhesive side facing down. For a standard chest design, a good rule of thumb is to place it about three to four fingers down from the collar. If you’re worried about it sliding around, use a bit of heat-resistant tape on the corners to hold it steady.
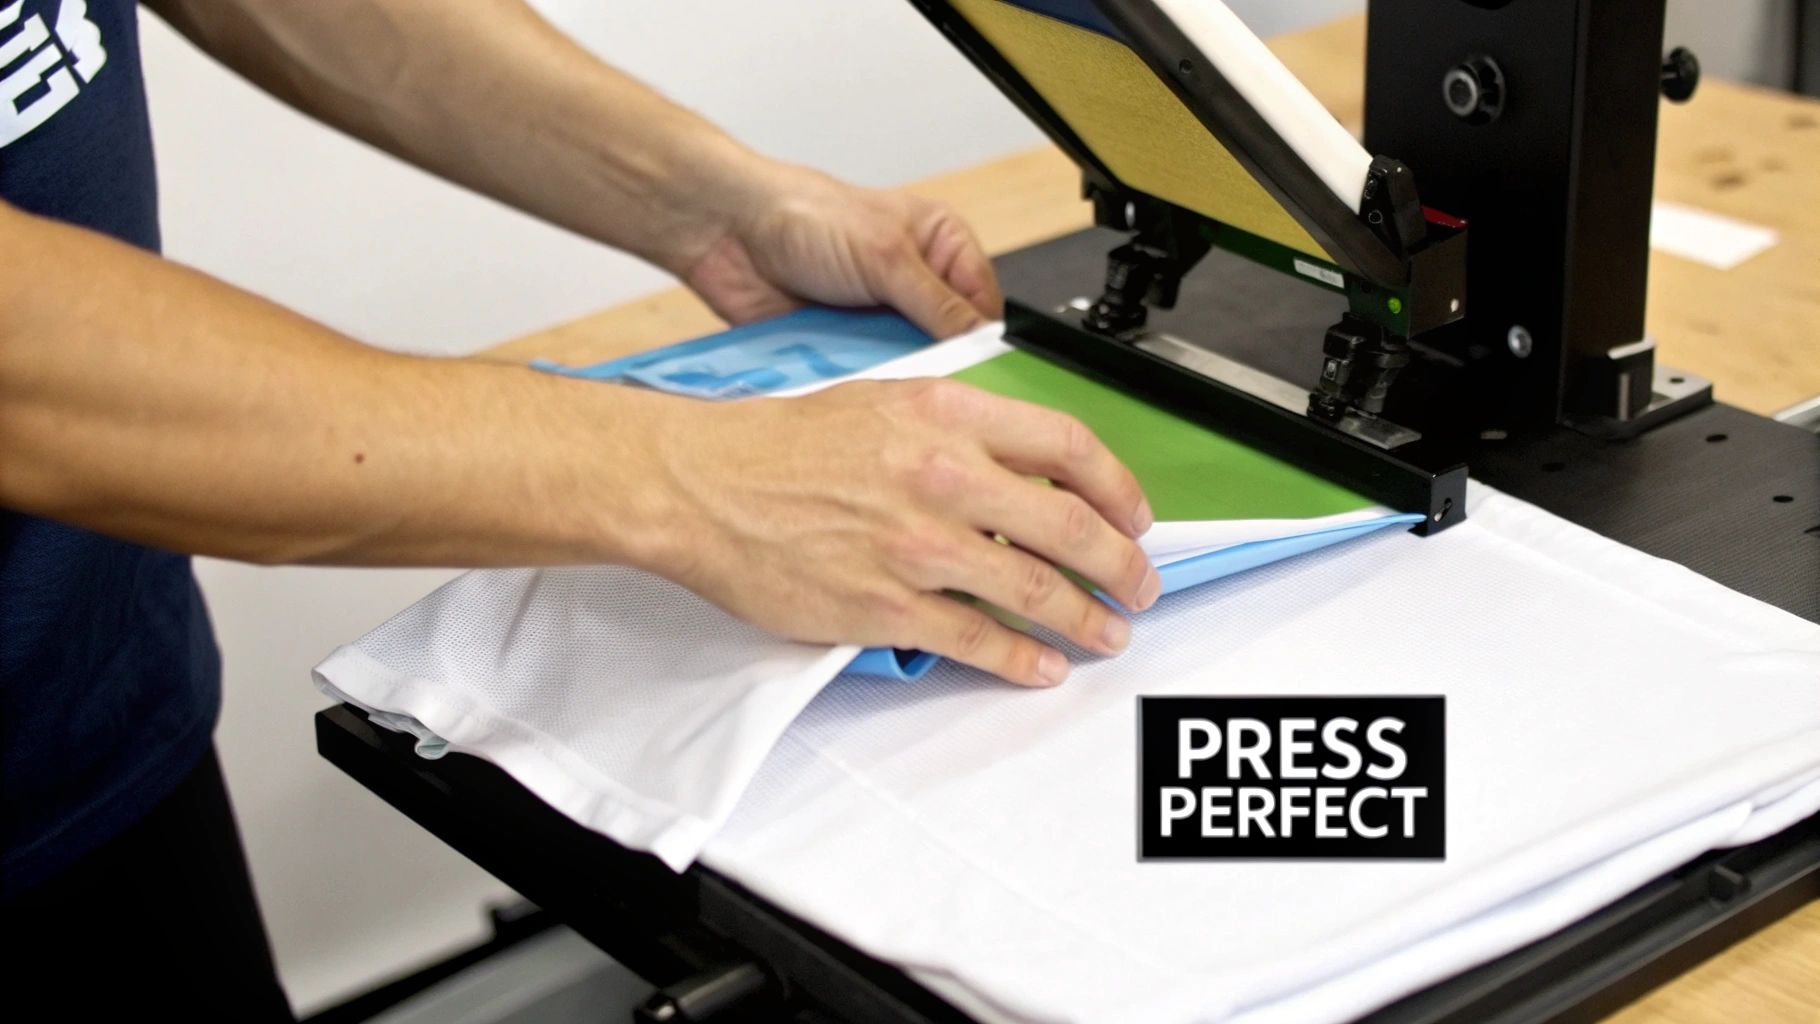
Step 3: Execute the Press
Before closing the press, lay a protective sheet over your transfer. A Teflon sheet or even a sheet of parchment paper will do the job perfectly. This little barrier stops the ink from sticking to the top platen and shields your garment from the intense, direct heat.
Now, with everything lined up, firmly close the press and hit the timer. The machine is now working its magic, applying the exact heat and pressure needed to cure the ink and bond the design permanently. Whatever you do, don't be tempted to open it early! Let the timer do its thing. For more tips on working with different materials, our guide on printed vinyl heat transfer has some extra insights.
Step 4: Peel and Reveal
As soon as that timer buzzes, open the press carefully. Now comes the moment of truth: the peel. How you do this depends entirely on the type of DTF transfer you're using. They are generally either hot peel or cold peel.
- Hot Peel: This means you can peel the film away immediately while everything is still piping hot.
- Cold Peel: You absolutely must let the garment and the transfer cool down completely before you even think about removing the film. If you try to peel a cold-peel transfer while it's warm, you'll ruin the design.
Always check your supplier’s instructions so you know which type you have. Once you’ve peeled back the film, your perfectly pressed shirt is finished and ready to go
Keeping Your Heat Press Safe and Well Maintained
Your heat press machine for shirts is a serious bit of kit and the real engine of your creative business. Just like any crucial piece of equipment, it needs a bit of regular TLC to perform reliably and, most importantly, safely for years on end. If you neglect maintenance, you're not just risking dodgy prints—you could be creating some serious safety hazards in your workspace.
A simple, consistent routine is all it takes to keep your machine in top nick. We’re not talking about complicated mechanical work here; it’s just about getting into a few good habits. By dedicating a few minutes before or after your printing sessions, you’ll protect your investment, get consistent results, and create a much safer environment to work in.
Simple Maintenance Checklist
Think of this as a quick pre-flight check before you start pressing. Running through these simple steps on the regular will stop common issues like uneven heating or residue transfer, which can completely ruin a perfectly good garment.
- Clean the Platen: Once the machine has totally cooled down, wipe the top and bottom platens with a soft, damp cloth. If you’ve got stubborn ink or adhesive residue, use a non-abrasive platen cleaner. Never use sharp tools to scrape it off, as you can permanently wreck the non-stick coating.
- Inspect Cords and Plugs: Give the power cord a quick once-over, looking for any signs of fraying, cracking, or damage. A damaged cord is a massive fire hazard and needs to be replaced immediately.
- Verify Pressure Settings: Every so often, check that your pressure adjustment knob is working smoothly. The pressure should feel consistent each time you lock the machine down.
Keeping your heat press clean isn't just about looking good. A build-up of gunk on the platen can act like an insulator, creating cold spots that lead to patchy heat distribution and failed transfers.
Non-Negotiable Safety Rules
A heat press gets incredibly hot, often reaching up to 200°C or more. Treating it with the respect it deserves is non-negotiable if you want to avoid nasty burns or other accidents.
Always run your machine in a well-ventilated area. Some materials can let off fumes when heated, and good airflow is crucial for a healthy workspace. Be constantly aware of the hot surfaces—the heat platen can cause a severe burn in a split second. Make sure any kids and pets are kept well away from your work area whenever the press is on.
Finally, get into the habit of switching off and unplugging the machine whenever you're not using it. While many modern presses have an auto-off feature, it's always best practice to disconnect it from the power completely. This simple action protects both you and your heat press machine in the long run.
Common Heat Press Questions Answered
Even with the best instructions in the world, a few questions always pop up when you’re getting to grips with new equipment. While a heat press machine for shirts is pretty straightforward, there are a few common hurdles that can trip up newcomers. Here are the quick, clear answers to the questions we hear the most.
Think of this as your go-to troubleshooting guide. We'll get to the bottom of those nagging problems that stand between you and a perfect print, helping you nail your technique.
Why Is My Design Peeling Off After Washing?
This is easily the most common frustration we see, but the fix is usually simple. If a design is peeling, it almost always comes down to the initial application. The bond between the DTF transfer and the fabric just wasn't strong enough to survive the wash.
More often than not, the culprits are:
- Not enough pressure: The adhesive wasn't physically pushed deep enough into the fabric’s fibres to get a proper grip.
- Temperature too low: The heat wasn't high enough to fully activate and cure the adhesive.
- Press time too short: The transfer simply didn't get enough time under the heat and pressure to form a permanent bond.
Always, always go back to the specific instructions from your DTF transfer supplier. And whatever you do, don't skip the pre-press! Getting moisture and any factory sizing out of the garment is vital for good adhesion.
Can I Use a Home Iron Instead of a Heat Press?
It's tempting, especially for a one-off project, but a standard home iron just isn't a substitute for a proper heat press. If you want any kind of durable, professional-looking result, a heat press is non-negotiable, particularly with modern DTF transfers.
An iron simply can't deliver the two things that matter most.
A heat press provides consistent, even pressure from edge to edge and a stable, precise temperature. A home iron has hot spots, uneven pressure distribution, and a temperature that swings all over the place. That's a recipe for a patchy, unreliable bond that will fail in the wash every time.
How Do I Stop White Shirts from Getting Scorch Marks?
There’s nothing worse than seeing a faint yellow or brown rectangle on a crisp white shirt. This scorching is caused by one thing and one thing only: too much heat for the fabric you're working with.
First, double-check that your temperature setting isn't too high for the material—polyester and blends are much more sensitive than 100% cotton. More importantly, always use a protective sheet like Teflon or parchment paper. This sheet acts as a crucial barrier, diffusing the direct heat from the platen and protecting the fabric.
If you’re still getting scorch marks even with a protective sheet, try knocking the temperature down by 5-10°C and adding a few extra seconds to the press time to compensate. This gentler approach usually solves the problem on delicate, light-coloured materials.
Ready to create vibrant, durable custom shirts with ease? At Psyque, we specialise in providing high-quality DTF transfers that work perfectly with your heat press. Explore our unique designs and services at https://psyque.co.uk to start your next project today.