
A Practical Guide to Vinyl Printing Shirts
Ever wondered how those sharp, vibrant designs get onto t-shirts? A lot of the time, the secret is vinyl printing, a brilliant method that uses a special material called Heat Transfer Vinyl (HTV) to bring custom designs to life.
Think of it like creating a professional, ultra-durable sticker that’s been engineered specifically to bond permanently with fabric. It's a game-changer for custom apparel.
So, What Exactly Is Vinyl Shirt Printing?
Vinyl shirt printing is a hugely popular way to customise clothing. The process involves cutting a design from a sheet of coloured vinyl and then applying it to a garment using a combination of heat and pressure.
Unlike printing methods that actually dye the fabric’s fibres, the vinyl sits right on top of the material. This creates a crisp, bold finish that really pops, especially on darker coloured clothing. It’s a fantastic way to make a design stand out.
The whole process starts by turning a digital design into something you can actually wear. A machine called a plotter, or vinyl cutter, precisely cuts your logo, text, or graphic from a roll of HTV. The real magic happens next: the cut-out design is placed onto a shirt and pressed with a heat press. This melts the heat-activated adhesive on the back of the vinyl, fusing it directly and permanently onto the fabric.
The Power of Heat Transfer Vinyl
Heat Transfer Vinyl, or HTV for short, is the star of the show here. It’s not just one single material, but a whole family of them, each offering a completely unique look and feel. The sheer versatility of HTV is a massive reason why vinyl printing shirts has become the go-to choice for so many people and businesses.
So what makes it so good?
- Vibrant Colours: Vinyl produces incredibly bold, solid colours that give off a clean, professional vibe.
- Durability: When it's applied correctly, HTV is seriously resilient. It can handle dozens and dozens of washes without cracking, fading, or peeling away.
- Cost-Effectiveness: For smaller batches or even one-off custom pieces, vinyl is often much more affordable than screen printing, which can have hefty setup costs.
- Creative Finishes: This is where it gets really fun. You can choose from a huge range of special effect vinyls, including glitter, metallic, holographic, and even 3D puff textures that add a whole new dimension to your design.
The real beauty of vinyl lies in how accessible and precise it is. It gives small businesses, sports teams, and individuals the power to create top-quality, custom gear without needing massive production facilities or committing to huge minimum orders.
This method is absolutely perfect for simpler graphics like names on the back of team jerseys, company logos on workwear, or bold slogans on t-shirts for a special event. It offers a quick turnaround and fantastic detail for designs that don't rely on complex colour gradients or shading.
If you want to get into the nitty-gritty, you can learn more about the possibilities with printed vinyl heat transfer in our comprehensive guide. It’s a brilliant starting point for seeing how this technique can bring your creative ideas to life on fabric.
From Digital Design to Finished Shirt
Ever wondered how a digital idea gets turned into a sharp, wearable design? That’s the magic of vinyl printing. It’s a process that blends the precision of technology with a satisfying, hands-on touch, transforming a simple graphic on a screen into a durable design you can actually wear.
The whole journey, from file to fabric, can be broken down into a few key stages. It starts with your digital artwork and ends with a hot press, but each step is vital for that professional, long-lasting finish.
This quick overview shows you the core stages, from creating the design to that final, satisfying press.
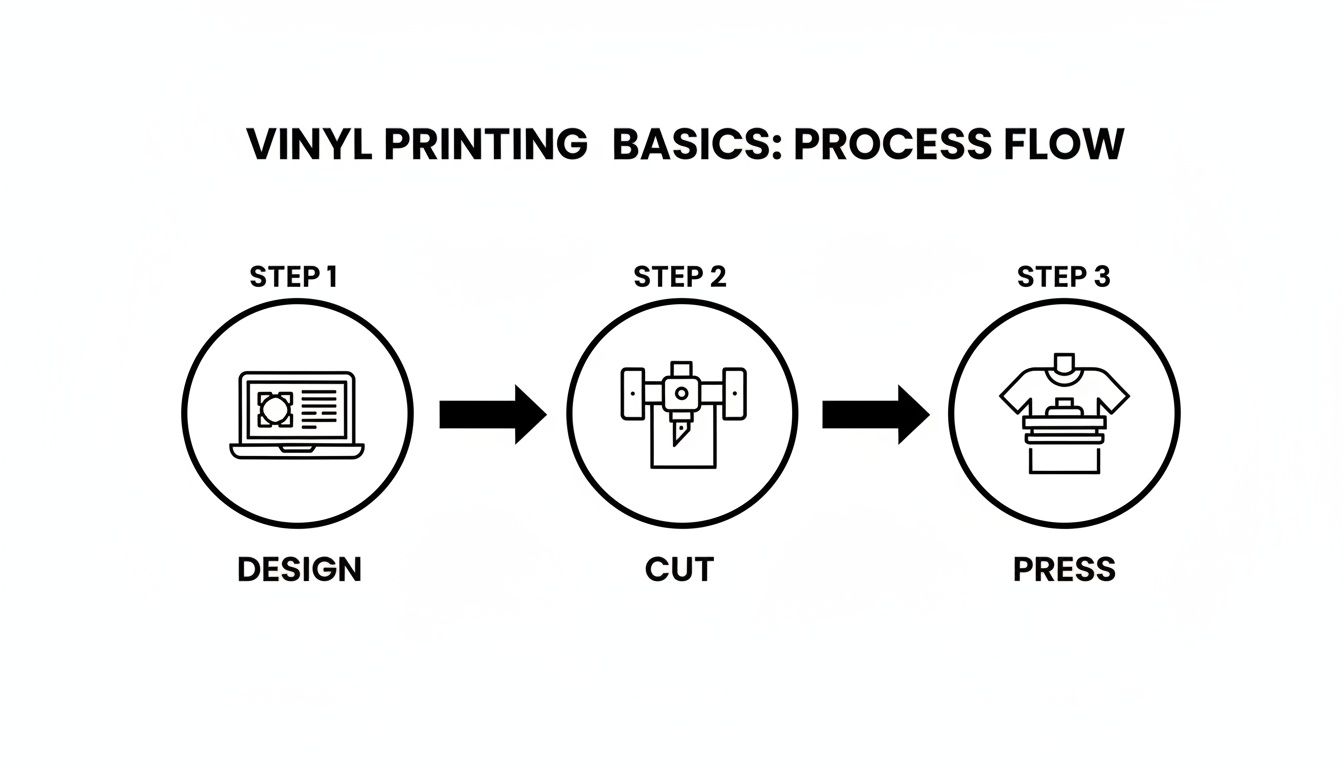
As you can see, it’s a seamless flow from software to machine to manual application, which is what makes the results so consistent.
Step 1: Creating and Preparing Your Vector Design
It all begins with the artwork. For vinyl printing shirts, the absolute must-have is a vector graphic. Unlike standard image files like JPEGs, vectors are built from mathematical lines and curves.
What does that mean for you? It means you can blow up your design from a tiny pocket logo to a massive back print, and it will never, ever get blurry or pixelated. We're talking file types like AI (from Adobe Illustrator), SVG, or EPS. It's also vital to get your colour settings right for printing; check out our guide on the differences between CMYK vs RGB for print to make sure your colours come out perfectly.
Once the design is ready, there’s one last, crucial step before cutting: you have to mirror the image. Since the machine cuts the design from the back of the vinyl, flipping it horizontally ensures it reads correctly when pressed onto the shirt.
Step 2: Cutting and Weeding the Vinyl
With the mirrored design loaded up, the vinyl cutter springs into action. Think of it as a super-precise robotic craft knife. It expertly follows every line of your vector file, slicing through the vinyl layer but leaving the clear plastic carrier sheet underneath completely untouched.
Once the machine’s done its part, it's time to get hands-on with "weeding." Using a small, sharp tool, you carefully peel away all the bits of vinyl that aren't part of your design. It takes a steady hand and a bit of patience, especially for complex graphics, but watching your design emerge from the sheet is incredibly satisfying.
Weeding is where the design really comes to life. It’s that moment when a flat sheet of coloured material becomes a logo, a piece of text, or an image, all ready to be pressed.
Step 3: Applying Heat and Pressure
Now for the final, transformative step. The weeded design, still attached to its sticky carrier sheet, is carefully placed onto the T-shirt. Then, the whole thing goes into a heat press, a machine that clamps down with the perfect combination of heat and pressure.
These three elements are the secret sauce for a design that lasts.
- Temperature: Usually set between 150-160°C, depending on the vinyl and fabric.
- Time: A quick press, typically for just 10-15 seconds.
- Pressure: Firm, even pressure is applied across the whole design.
The heat activates the powerful adhesive on the back of the vinyl, and the pressure makes sure it sinks right into the fibres of the fabric. After the timer goes off, the press opens. You let it cool for a moment, peel back the clear carrier sheet, and your design is left perfectly bonded to the shirt.
Choosing Your Vinyl and Shirt Wisely
The final quality of any vinyl-printed shirt comes down to two things: the vinyl you choose and the garment you press it onto. Think of them as the canvas and the paint. Get this combination right, and you're well on your way to a professional, durable final product that really stands out.
Not all vinyl is created equal, after all. Heat Transfer Vinyl (HTV) is a surprisingly diverse family of materials, and each type has its own personality. Choosing the right one can transform a simple design into something special, adding texture, a pop of shine, or a classic soft feel that perfectly suits your project.
The shirt's fabric is just as important. Its material—whether it's cotton, polyester, or a blend—dictates how it will react under the heat press and how well the vinyl will bond with its fibres for the long haul.
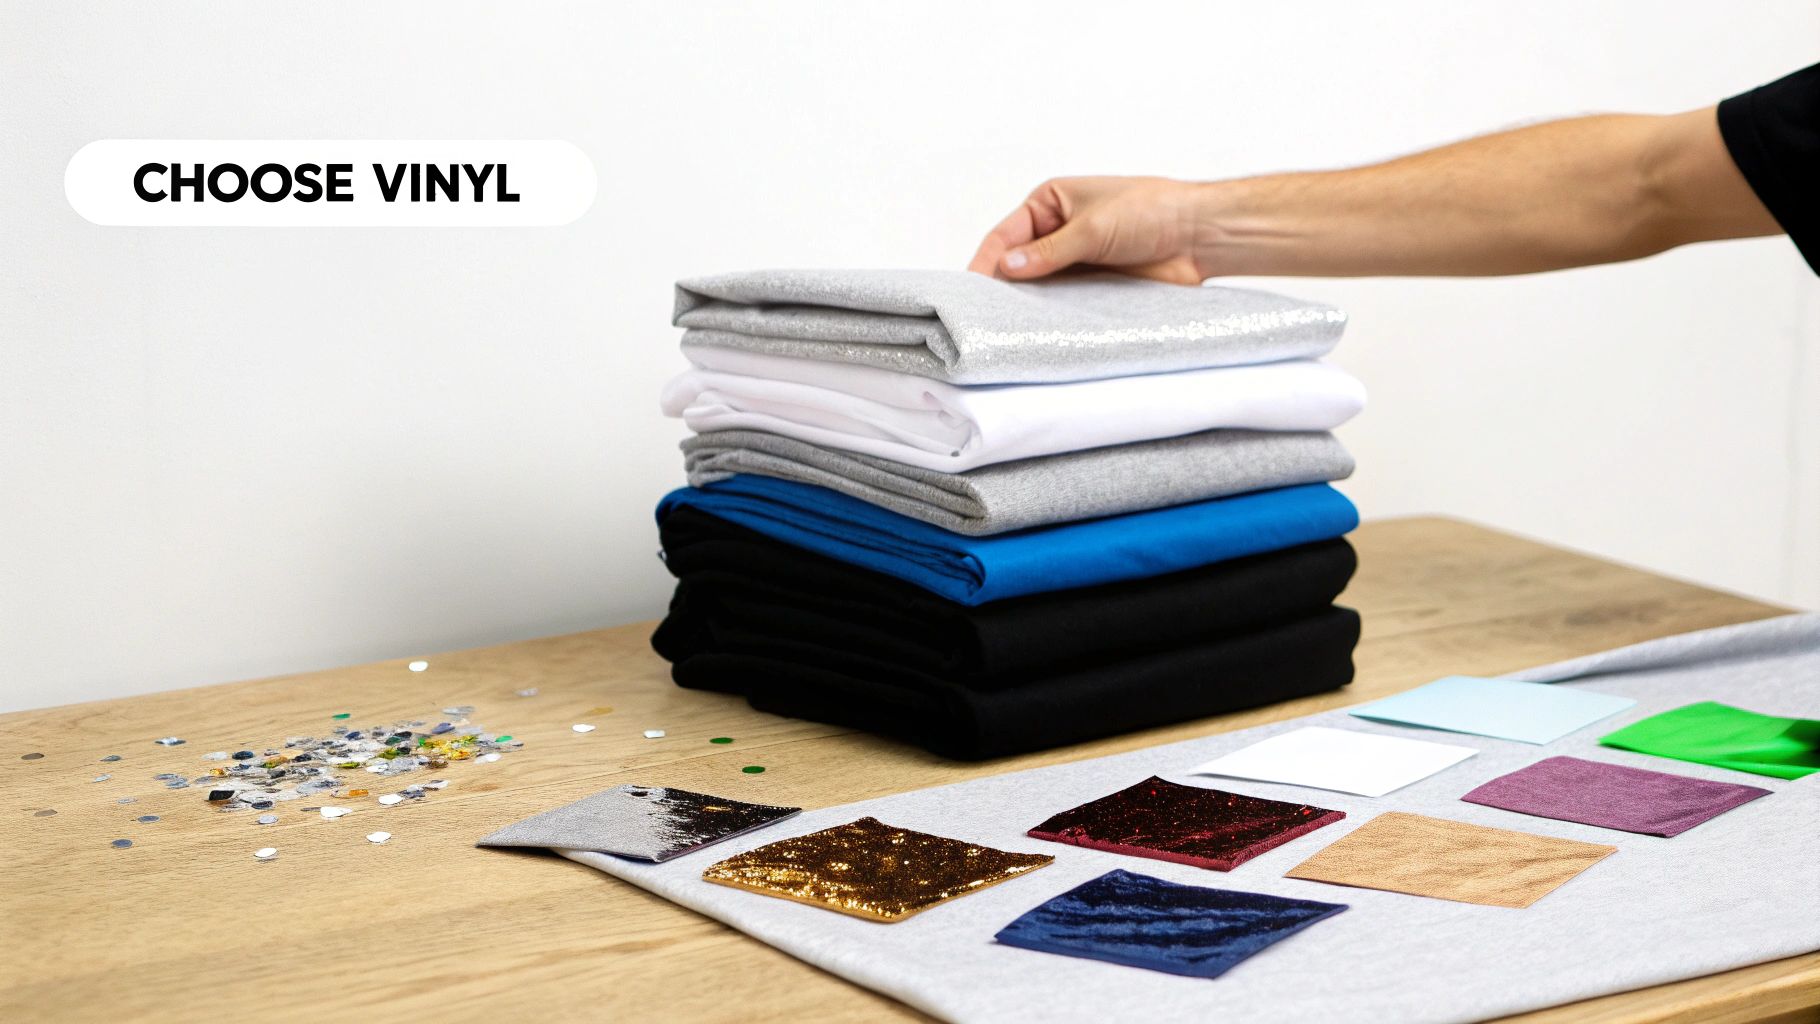
A Guide to Heat Transfer Vinyl Types
Once your design is finalised, picking the perfect vinyl is your first big creative decision. Each type offers a completely different finish, so understanding your options is the key to getting the look you're after.
The most common choice you’ll come across is Standard PU (Polyurethane) vinyl. This is your reliable workhorse—it’s known for being thin, flexible, and having a soft feel that blends right into the fabric. It's the perfect go-to for most logos, text, and graphics where comfort is a priority.
For designs that need to make a real statement, Glitter vinyl is the undisputed champion. It’s packed with vibrant, sparkling flakes that catch the light beautifully, making it perfect for fashion pieces, hen party tops, or fun kids' clothing. It has a slightly rougher texture, but you can't beat the visual impact.
Then there’s Flock vinyl, which gives a unique and luxurious finish. With its soft, slightly raised, suede-like texture, it adds a premium feel to any garment. It's a fantastic choice for retro designs, university-style lettering, or logos that need a touch of class.
The right vinyl does more than just display a design; it enhances the entire feel and character of the garment. Matching the vinyl's texture and finish to the design's intent is what elevates a good shirt to a great one.
Beyond these core types, a whole world of speciality vinyls awaits:
- Metallic Vinyl: Gives you a smooth, shiny, foil-like finish that mimics the look of metal.
- Holographic Vinyl: Creates a stunning iridescent, rainbow effect that shifts and changes with the light.
- Puff Vinyl: Expands under the heat press to create a cool, 3D "puffed up" effect.
Each of these opens up new creative doors. If you're looking to dive deeper into the machinery behind it all, our guide on choosing a vinyl printer for shirts is packed with valuable insights into the equipment that brings these vinyls to life.
Heat Transfer Vinyl (HTV) Type Comparison
To help you visualise the options, here's a quick breakdown of the most common HTV types and where they shine.
| Vinyl Type | Best For | Finish & Feel | Durability |
|---|---|---|---|
| Standard PU | Everyday wear, logos, text | Smooth, soft, flexible | Excellent |
| Glitter | Fashion apparel, celebratory tops | Textured, sparkly | Good |
| Flock | Premium branding, retro designs | Soft, raised, suede-like | Very Good |
| Metallic | Bold accents, statement pieces | Shiny, smooth, foil-like | Good |
| Puff | 3D effects, creative designs | Raised, soft, textured | Moderate |
Choosing the right type from this list is the first step in matching your design's vibe with the perfect material finish.
Selecting the Perfect Garment
Once you've picked your vinyl, you need the right shirt to press it onto. The fabric is the most critical factor here, as it determines durability, comfort, and how well the vinyl will actually stick.
100% Cotton is a classic choice for a reason. It's breathable, soft, and provides a brilliant surface for most types of HTV. The natural fibres give the vinyl's adhesive something to really grab onto, resulting in a design that lasts. It's the go-to for everyday t-shirts and promotional wear.
100% Polyester is the top pick for sportswear and performance gear, mainly for its moisture-wicking properties. It does, however, require a bit of special attention during pressing. Polyester is more sensitive to high heat, so you'll need to use a lower temperature and a vinyl specifically made for synthetics to avoid scorching the fabric.
Cotton/Polyester Blends (like a 50/50 mix) often give you the best of both worlds. They have the softness of cotton combined with the durability and wrinkle-resistance of polyester. This versatility makes them a hugely popular and reliable option for a wide range of vinyl printing shirts projects.
Ultimately, the goal is to create a perfect partnership between the vinyl and the fabric. A stretchy vinyl on a stretchy polyester blend ensures the design moves with the garment. A classic PU vinyl on a sturdy cotton shirt provides a timeless, durable finish. Making this match thoughtfully is what ensures your custom creation won't just look fantastic on day one, but for many washes to come.
How Vinyl Printing Compares to Other Methods
When you’re looking to get a custom shirt made, you’ll find yourself at a crossroads with a few great options. It’s a bit like picking the right tool for a DIY job—you wouldn’t use a sledgehammer to hang a picture frame, would you? Vinyl printing, screen printing, and Direct-to-Garment (DTG) each have their own moments to shine.
Vinyl printing is your precision tool. Think of it as applying a perfectly cut, high-quality graphic that’s specifically designed for fabric. It’s unbeatable for bold logos, names, and numbers that need to look sharp.
Screen printing is more like using a stencil, a classic method that’s brilliant for pumping out large batches of the same design. Meanwhile, DTG is the high-tech option, acting like a sophisticated inkjet printer that applies ink directly onto fabric, making it perfect for reproducing photos and complex, multi-coloured images.
Getting to grips with their differences in cost, feel, and durability is the secret to making the right call for your project. Whether you need one special shirt or a hundred for an event, choosing the right method means getting the best result for your design and your budget.
Vinyl vs Screen Printing
The classic showdown in the custom apparel world is almost always between vinyl and screen printing. Screen printing works by creating a mesh screen—essentially a stencil—for each individual colour in your design. Ink is then pushed through the screen onto the shirt. That setup process takes time and money, which is why it really only makes sense for high-volume orders.
Once those screens are prepped, however, you can print hundreds of shirts incredibly quickly and cheaply per item. On the flip side, vinyl printing shirts requires zero screen setup. This makes it the undisputed champion for small batches, one-off prints, and personalised gear like team jerseys with individual names and numbers. For small orders, vinyl is almost always the faster and more economical choice.
The UK's custom t-shirt printing market, where vinyl heat transfers are a major player, is seeing some serious growth. It's set to expand at a CAGR of 11.84% between 2025 and 2033, climbing from £366.63 million to an estimated £1,004.13 million. While screen printing has a huge slice of the market, vinyl's knack for short runs can cut costs by up to 30% compared to traditional methods for any order under 50 shirts.
Vinyl vs Direct-to-Garment (DTG)
Direct-to-Garment printing is the modern alternative. It uses a specialised printer to spray water-based inks directly into the fibres of the fabric. The result? Stunningly detailed, full-colour designs, including photographs and complex gradients, that feel incredibly soft to the touch.
DTG's biggest selling point is its ability to handle unlimited colours without any extra setup costs. However, it performs best on 100% cotton and can look a little less punchy on dark-coloured garments unless a white underbase is printed first. Vinyl, in contrast, delivers exceptionally bold, opaque colours that pop on any fabric colour you can think of, including jet black.
Vinyl gives you a distinct, crisp finish that sits proudly on top of the fabric. This creates a sharp, clean edge that DTG’s ink-soaking method simply can't match. If your design is a simple, bold graphic, vinyl will almost always look cleaner and more vibrant.
If you’re just starting to think about your own apparel, our guide on how to get my design on a T-shirt is a great place to start. It’ll walk you through how to prepare your artwork, no matter which printing method you choose.
Printing Method Feature Breakdown
To help you visualise where each method excels, we've put together a quick comparison table. Think of this as your cheat sheet for picking the perfect printing technique for your next project.
| Feature | Vinyl Printing | Screen Printing | DTG (Direct-to-Garment) |
|---|---|---|---|
| Best For | Small batches, logos, text, names | Large bulk orders (50+) | Full-colour photos, complex art |
| Cost Per Shirt | Low for small runs | Very low for high volumes | Moderate for single items |
| Colour Vibrancy | Excellent, very bold and opaque | Good, can be very vibrant | Excellent, unlimited colours |
| Durability | Very durable, lasts 50+ washes | Extremely durable, can outlast shirt | Good, but can fade over time |
| Design Complexity | Best for simple shapes and text | Can handle detail, but each colour adds cost | Perfect for intricate, detailed designs |
Ultimately, there's no single "best" method—just the best one for your specific needs. By weighing up your budget, the quantity you need, and the artwork itself, you're now equipped to choose with confidence.
Keeping Your Vinyl Printed Shirts Looking New
So you've got your new custom shirt, and it looks brilliant. That's an investment in your personal style or brand, and you'll want to keep it that way. The good news is, with a few simple habits, you can keep the design looking as sharp and fresh as the day it arrived.
Think of the heat transfer vinyl as a durable, flexible layer that's been fused right onto the fabric fibres. It's tough, for sure, but its one big weakness is high heat. If you get it too hot, the adhesive can soften up, causing the design to warp, pucker, or even start peeling away. It's all about protecting that bond.
This is why your washing machine and tumble dryer settings are so crucial. Treat your shirt with a bit of care, and that design will stay put for dozens and dozens of washes.
Essential Washing and Drying Rules
Following a few straightforward rules will make a huge difference to the life of your shirt. These aren't just suggestions; they're the tried-and-tested best practices for keeping that vinyl application looking perfect.
- Turn It Inside Out: This is the single most important thing you can do. Turning your shirt inside out before it goes in the wash protects the vinyl from getting scuffed and scraped by other clothes or the inside of the machine.
- Wash on a Cool Cycle: Always go for a cool wash, ideally at 30°C or even lower. Hot water can slowly weaken the vinyl's adhesive, which is what leads to peeling or cracking down the line.
- Use a Mild Detergent: Harsh chemicals, bleach, and even some fabric softeners can degrade the vinyl over time. Stick to a gentle, colour-safe detergent to get things clean without causing any harm.
Once the wash cycle is done, the next step is just as critical.
The biggest mistake anyone makes with a vinyl printed shirt is throwing it in the tumble dryer. That intense, prolonged heat is the fastest way to ruin a design, causing it to shrink, bubble, or detach completely. Air drying is always the best option.
Ironing and Long-Term Care
If your shirt gets a bit creased, you can absolutely iron it—you just need to be careful. Never, ever put a hot iron directly onto the vinyl design itself.
Instead, flip the shirt inside out and iron the reverse side on a low heat setting. Another trick is to place a thin piece of cloth, like a tea towel or some parchment paper, over the design before you press. This creates a safe barrier, letting you smooth out wrinkles without melting the vinyl.
Professionally applied heat transfer vinyl is built to last. It's often rated to withstand 50 washes or more, which makes it a really durable choice for the often unpredictable UK weather. If you want to dive deeper into how different materials hold up, you can learn more in our guide on printed heat transfers. With the right care, your custom shirt will be a favourite in your wardrobe for years to come.
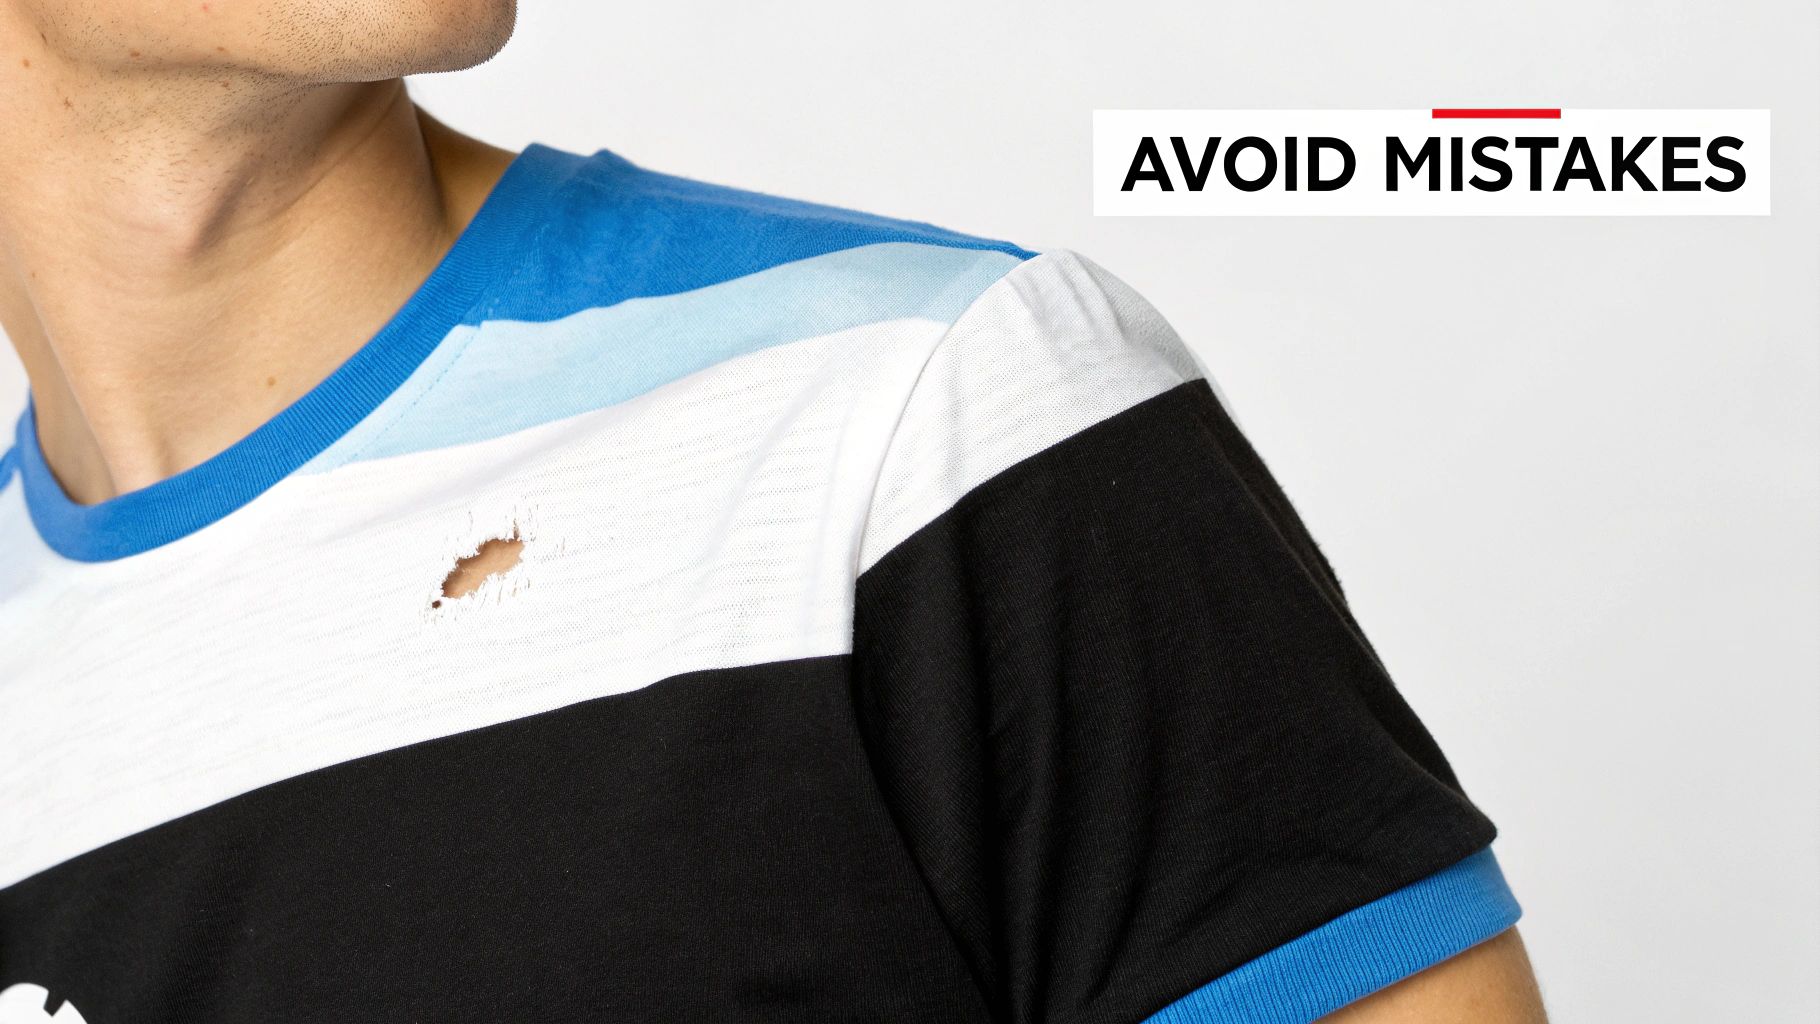
Common Vinyl Printing Mistakes to Avoid
Diving into vinyl shirt printing is brilliant fun, but a few common slip-ups can quickly turn a great idea into a frustrating mess. Knowing what to watch out for is the key to saving yourself time, materials, and money. It’s the difference between a shirt you’re proud of and one that ends up at the back of the wardrobe.
These mistakes usually fall into two camps: little errors made during the creation process, and tell-tale signs of low-quality work that anyone buying a custom shirt should look for. From getting the technical settings wrong to overlooking a tiny detail, these pitfalls are easy to fall into but, thankfully, just as easy to avoid with a bit of know-how.
Errors in the Creation Process
For anyone making their own vinyl shirts, precision is everything. A single oversight can compromise the entire garment. Paying close attention at each stage is what gives you that professional, durable finish.
One of the most frequent errors, and a real face-palm moment for beginners, is forgetting to mirror the design before cutting. Because Heat Transfer Vinyl is cut from the back, your design must be flipped horizontally. Skip this step, and all your text will read backwards when you press it onto the shirt. It's a classic mistake, and a costly one.
Another major issue is using the wrong heat press settings. Every type of vinyl and fabric has its own perfect recipe of time, temperature, and pressure. Too little heat and the vinyl won’t stick properly, leading to peeling after the first wash. Too much, and you risk scorching the shirt or melting the vinyl into a gooey mess, ruining both.
A successful vinyl application is a science. The manufacturer's recommended settings aren't just suggestions; they are the precise formula needed to activate the adhesive and create a permanent bond with the fabric fibres.
Finally, a poor choice of materials can doom a project from the start. A common example is using a standard, non-stretch vinyl on a stretchy fabric like a polyester sports top. The first time the garment is worn and stretched, the rigid design is likely to crack and split, as it simply can’t move with the fabric.
How to Spot Low-Quality Vinyl Work
If you're buying custom vinyl shirts, you need to know how to spot a quality job. A well-made shirt will look sharp and last for years, but a poorly made one will quickly show its flaws.
Here are the key warning signs to look for:
- Peeling Edges or Corners: This is the most obvious red flag. If the edges of the design are lifting, it means the vinyl wasn't applied with enough heat or pressure and will likely come off completely in the wash.
- Bubbles or Wrinkles: A perfectly applied design should be smooth and flat against the fabric. Any visible air bubbles or puckering under the vinyl indicates it wasn't pressed correctly.
- Misaligned Layers: For multi-colour designs, check that all the vinyl layers line up perfectly. Gaps or overlaps between colours suggest a rushed or careless application.
By recognising these common pitfalls, both creators and customers can ensure every vinyl printed shirt is a success. Avoiding these simple mistakes leads to a flawless, professional result that looks great and is built to last.
Got Questions About Vinyl Printing?
Right, we've covered a lot of ground on vinyl printing, but you might still have a few things you're wondering about. This is where we’ll tackle the most common questions that pop up, from how long your design will last to what it might cost. Think of it as a final chat to clear up any lingering queries.
These quick answers should tie everything together, giving you the confidence to make the right call for your next custom apparel project.
How Long Does Vinyl Printing Last on a Shirt?
This is the big one, isn't it? And the good news is, when it's done right with quality Heat Transfer Vinyl (HTV), it’s incredibly durable. You can realistically expect your design to handle 50 washes or more before you see any signs of cracking, peeling, or fading.
The secret to making it last is all in the aftercare. Just turn the shirt inside out, wash it on a cool cycle, and for goodness' sake, keep it out of the tumble dryer. This protects the adhesive and keeps the design looking sharp.
Can You Print Complex or Multi-Coloured Designs with Vinyl?
Yes, you can, but it’s a bit like building with Lego. Vinyl printing is fantastic for bold, solid-coloured graphics, logos, and lettering. If you want multiple colours, you simply layer different pieces of vinyl on top of one another. It's a brilliant technique for designs with clean, separate blocks of colour.
Where vinyl hits its limit is with things like photos, soft gradients, or intricate shading. For that kind of detail, you’d be better off looking at a method like DTG (Direct-to-Garment) printing, which works more like a paper printer but for fabric.
The best way to think about it is that vinyl is assembled like a mosaic, piece by piece, whereas DTG paints the full picture at once. For crisp lines and vibrant, separate colours, vinyl is king.
Is Vinyl Printing Expensive for Small Orders?
Absolutely not. In fact, this is where vinyl printing really comes into its own. Methods like screen printing need a separate screen for every colour, which means hefty setup costs. With vinyl printing shirts, there’s practically zero setup fee.
This makes it the perfect, most cost-effective choice for small batches, one-off gifts, or personalised gear. Whether you need one shirt for a birthday or a dozen for your five-a-side team, vinyl gives you a professional finish without the big upfront cost.
What Kind of Fabrics Work Best with HTV?
Heat Transfer Vinyl is pretty versatile and gets on well with most common fabrics. The top contenders are:
- 100% Cotton: A classic choice. Cotton provides a fantastic surface for the vinyl to grip onto, making it a super reliable option.
- 100% Polyester: Perfect for sportswear and performance gear. You just need to use the right type of vinyl and a lower heat setting to avoid scorching the material.
- Cotton/Polyester Blends: These give you the best of both worlds – the softness of cotton and the resilience of polyester. They’re a brilliant all-rounder for HTV.
Just make sure the vinyl you’re using is designed for the fabric you’ve chosen. Getting that match right is the key to a print that sticks around.
Ready to bring your own unique designs to life with stunning, durable prints? At Psyque, we specialise in high-quality DTF printing, offering the vibrant colours of vinyl with even greater detail and flexibility. Explore our collections or upload your own design today. Start creating with Psyque.